Tuesday, November 26, 2013

Paint Strip Turkey

 
Ahhhh, Thanksgiving...how do I love thee? Let me count the caloric intake! Here's a cute and quick craft for children to complete in preparation for the upcoming Thanksgiving holiday:
 
 
Materials:
 
-toilet paper tube
-brown construction paper
-orange construction paper (scraps work well)
-google eyes
-paint strips in fall colors (5-6)
-glue
-stapler and staples
 
Instructions:
 
1. Wrap toilet paper tube in brown construction paper and staple to hold in place Trim remaining paper.
 
2. Cut out two feet out of brown construction paper and glue to the bottom of the tube. You could also use orange construction paper for the feet, if you so choose.
 
3. Using the orange construction paper, cut out a small triangle and glue toward the top of the tube for the beak.
 
4. Glue 2 google eyes above the beak.
 
5. Spread out paint strips and staple to tube
 
This year, I am unbelievably thankful for family, friends, good health...and quick, craft projects! Whoop!!!

Tuesday, November 19, 2013

Children's Book-Themed Baby Shower


Hey there! I am sooo excited to share with all of you the pictures from a children's book-themed baby shower my sister-in-law Julie amazingly put together for a friend of ours! I mean, this girl went ALL OUT for our friend, Melissa, who just so happens to be a librarian (Seriously...is there really ANY other theme that could have been chosen?). Each table boasted a letter to represent the theme of the table itself (ie-"G" for games). Did I mention that Julie decoupaged each of the letters herself with children's book pages and letters she cut out using her Cricut? Yeah...she's amazing! Please check out the pics below showing off all of the amazing-ocity that was this shower! You won't regret it!


"D" is for "Decorating"
Julie purchased a number of bibs, onesies in a variety of sizes, and iron-on transfers that guests could use to decorate items the baby could wear. Each guest put her name on the tag, so that Melissa could know exactly who created each item when she puts them on her precious daughter!


"P" is for "Prizes"
As if this shower wasn't cool enough, the hostess with the mostest had fantastic prizes (Ummm... Lenox plate anyone??? Hellooo!). Not only is this girl an incredible shower planner, she is also a phenomenal bargain shopper!


"A" is for "Advice"
To go along with the children's book-theme, Julie made an advice book for the soon-to-be-parents to look like a Golden Book (you know the ones I'm talking about) for guests to fill out.


Without a doubt, my favorite element of this shower was how incredible these cookie favors looked. Julie found an amazing company online that willingly created these delicious masterpieces based on the book covers of some of Melissa's all-time, favorite books. Best favor I think I've ever received!!!


"M" is for "Monster"
I totally heart this amazing idea for the centerpieces! Each table was themed according to a popular, children's book using the book itself, stuffed animals, and toys to compliment it. I know, right?!?! How cute is this There's A Monster at the End of This Book table?


"G" is for "George"
Here is the guest of honor's table, themed around the book Curious George Goes to the Zoo. The frames on each table showcased a quote from each book (as if the decorations weren't amazing enough already...)
 

"V" is for "Velveteen Rabbit"
How sweet are these decorations in honor of everyone's favorite, classic The Velveteen Rabbit? Place cards were also made for each guest indicating their table letter and corresponding book. This girl thought of everything!!!


"C" is for "Cat in the Hat"
How cute is the bath toy fish in the fish bowl? Love!!!


"F" is for "Fancy Nancy"
This table was PERFECT for the little girls sitting at it!

 
"B" is for "Berenstain Bears"
Love the jewelry boxes used for boxes of toys!


"L" is for "Llama Llama"
How cute is this set up? I couldn't even tell you where she found all the props for her centerpieces, but the lucky mama now has them to keep when her little sweetheart is old enough to put them to great use!


If you've ever been to Oakmont Bakery in Pittsburgh, you know that they make incredible cakes, but this one literally takes the cake (see what I did there?)! They decorated four different flavors of sheet cakes to look like a stack of Melissa's favorite children's books. I am particularly fond of the fondant, Very Hungry Caterpillar!


"P" is for "Photo Booth"
Melissa is a huge fan of cut outs and somehow manages to find them everywhere she goes, so when Julie asked me to make a few based on popular children's book characters, I happily complied! Using foam core board and acrylic paint, guests could transform themselves into Corduroy, The Very Hungry Caterpillar, Winnie the Pooh, and Curious George...at least for a few, great pictures. Check out more pics of guests enjoying the photo booth fun HERE!


Saturday, November 16, 2013

Ribbon Turkey Vase

With turkey day fast approaching, I thought I'd add a little throwback project into the mix! While putting out Thanksgiving decorations, I came across this little gem I made a few years back for an online competition run by The Dollar Tree (2nd place, what what?!?!) using items found at their stores. The coolest part? The vase used as a base for this project gives this turkey a huge number of possibilities: add lights for extra sparkle, use it as a candy holder, the sky is the limit! Here's how to  make an adorable gobbler of your own:

Materials:


-scissors   
                                    
-1/2” width red ribbon spool
                      
-1 ½” width brown ribbon         

-glue gun and sticks
-1 ½“ width orange ribbon
-pipe cleaners                     
      
-large google eyes
-glass vase

Instructions:
 
1.    Wrap brown ribbon around the glass vase in a criss-cross fashion, adding dots of hot glue to secure

2.    Cut two “wings” out of brown ribbon and glue to the sides of the vase.

3.    Using the brown and orange ribbon, cut four feather shapes out of each color. Cut pipe cleaners to the length of the feathers and glue along the middle of each “feather” so that they are now sturdier and more flexible (the pipe cleaner side of the feather will be facing away from the turkey when pieced together)

4.     Fan out the brown and orange feathers and glue towards the opening of the vase on the side that you have designated to be the back of the turkey.

5.   Using the orange ribbon, cut off a 4” piece and fold in half without creasing. Glue the ends of the ribbon together to form the turkey’s “beak” and glue the opposing end of the ribbon to the front of the vase near the opening.
6.    Fold and glue red ribbon into “B” shape and glue beside the beak for the “gobbler”

7.    Glue google eyes toward the top of the vase


Thursday, November 7, 2013

Mickey Mouse Clubhouse Birthday-Part 2


Many of you may have already seen the ideas posted from my niece's Mickey Mouse Clubhouse-themed party. If not, check them out HERE!
As it turns out, my nephew Royce is a HUGE MMCH fan, himself (just like every other child in America), so he had himself a similarly-themed party. Here are some pics of the awesome party and the super-cute birthday boy, himself. This party even featured an appearance from the big mouse himself! Check it out...


The adorable birthday boy in his Mickey-eared party hat


Wooden clubhouse sign, made by my bro-in-law leading party-goers to their destination


Mickey centerpieces


Favor bags for the attending kiddos


How unbelievably cute is this Mickey cake my sister made using 6 round cakes and two cupcakes?!?!


Hot dog table and fixins displayed in Mickey bowls
Royce being introduced to Mickey...he wasn't the biggest fan of him in person, but was sooo excited Mickey came to his party after it was all said and done

Family pic with Mickey (love Royce's face in this one, haha!)


Tuesday, November 5, 2013

Revamped-Letter Signs to Potluck Labels


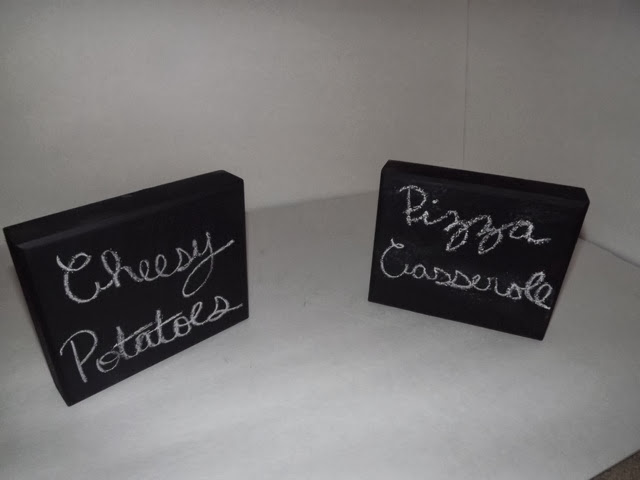
Ever go to a potluck dinner where you look at one of the gazillion delicious looking casseroles and say to your husband or friend "What do you think is in that?" I can't even imagine how treacherous these types of meals could be to those with food allergies. How helpful would it be if each bit of deliciousness was labeled appropriately?


Have no fear, the crazy craft lady is here...


I recently purchased a few 5x7" wood plaques at my local thrift store for $.50 each and decided to transform them into Potluck-friendly food displays. I simply sanded the sides and front of the plaques, sprayed two coats of chalkboard paint on them and Voila! The options for these little free-standing plaques are endless---price displays at craft fairs, tic-tac-toe or Pictionary boards for on the go games, scoreboards for sporting events...what else can you come up with???