Friday, December 30, 2011

Best Christmas Gift EVER!!!

Pic of Kellen modeling the stork costume

Every holiday season, I am reminded just how fortunate my husband and I are to have the family and friends that we do! This holiday was no different...except for the fact that we now had the pleasure of telling the people we love that we would be helping to expand the family with an addition coming in June!!! In case I haven't made myself clear, WE'RE PREGNANT!!! Being the nerd that I am, I knew that simply telling extended family the great news would not be enough. As a result, I recruited my brother Kellen, always the life of the party and never one to turn down an opportunity to draw attention to himself, to help me out in spreading the word.

Using 1 1/2 yards of white felt, 1/4 yard of orange felt, and 1/2 yard of black felt, I created a stork costume for Kellen. Using a mixture of hand-sewing and machine stitching, I sewed together a hood with a beak and eyes, along with the body and wings. Using the orange felt, I cut out legs and feet and pinned them to the body once my model was ready to be costumed. Since we were at my grandparents' house for the big reveal, we decided to use their chair lift to help the stork in his descent down the stairs. My brother certainly did not disappoint as he flapped his "wings" and squawked down the stairs, explaining to the confused bystanders that he was a stork. He then presented my grandparents with a package that, once opened, held our sonogram pictures and a message that read "Merry Christmas from the newest addition to the Dalby family. Coming to a hospital in Pittsburgh: June, 2012." After a brief moment of confusion as to who exactly was having the baby (as I have a number of cousins and siblings, all around the child-bearing age), we revealed what we had been keeping a secret for FAR TOO LONG, and the reactions were more than we could have ever imagined! Video for further proof to come in the future!

A stand-up view of the bird himself (don't mind the elbows of others taking pics!)

BEST CHRISTMAS EVER!!!!!!!

Sunday, December 18, 2011

Decorate Your Own Mustache Mugs


This is one of my absolute favorite craft projects and perfect for the gift recipient with a great sense of humor! I used "Google Images" to look up pictures of mustaches for inspiration. Using a black, ceramic marker, I drew and colored a different type of mustache at the top of each mug. After I was satisfied with my masterpieces, I set my oven to 275 degrees and placed the mugs into the oven for 45 minutes to set the marker and avoid smudging. I will not say who the recipient of this gift could potentially be, but I will say that they are in for a very good time once they receive them!

Thursday, December 15, 2011

How To: Family Keys Holder


Here is another cute and easy idea for a personalized gift:

Materials:
-unfinished, plaque with hangers
-black, acrylic paint
-silver paint marker
-acrylic sealer

Steps:

1. Cover the hangers with tape to avoid getting paint on them

2. Using a foam, paint brush, paint at least two coats of black, acrylic paint onto the unfinished wood

3. Use the silver paint marker to label each key hook (in my case, I labeled three of the four with the names of the people in my brother's family; Camdyn is only one, so I also added some "keys" for her to use for the next fifteen years! And the other key hook could've been labeled "guest," but I figured I would save a spot for their next child, whenever he or she comes along).

4. Spray two coats of acrylic sealer over the entire plaque and let dry.

Easy peasy, lemon squeezy!!!

Tuesday, December 13, 2011

Scrabble Tile Coasters-third and final Scrabble gift, I promise!

Scrabble tile coasters for my mother-in-law, Francie, and my father-in-law, Bob

Here is another SUPER simple Christmas gift idea using (you guessed it!) Scrabble tiles! Using blank coasters (I found  a pack of 6 blank coasters at my local craft store for just under $2, score!), I arranged 4 rows of 5 Scrabble tiles, spelling out the names of the recipients in the second row (for my mother-in-law, Francie, I obviously also used a portion of the third row, as well!). After determining the order of letters, I removed them and painted a thick coat of Mod Podge across the front of the coaster. I then put the letters back onto the coaster in their appropriate order, making sure to center them as much as possible. After allowing the Mod Podge to dry for about 20 minutes, I spread two more layers of Mod Podge over the top of the Scrabble tiles and allowed them to dry. Using an acryllic sealant, I sprayed the coaster, allowed it to dry, and Voila!!! An unbelivably quick and easy craft project that works as a functional and personalized gift for any recipient!

Sunday, December 11, 2011

Scrabble Tile Name Plaques


Scrabble tile frame featuring my name, my husband's name, our last name, and "Love"


If you've read my previous posts, you know that my newest craft material obsession is Scrabble tiles! In addition to the Scrabble tile pendants I've been making, I am now branching out to Scrabble tile frames. I simply bought a frame and cut out houndstooth scrapbook paper to fit the inside of the frame for the background. I then laid out the words I wanted to display in crossword puzzle fashion (this part was probably the most time-consuming, as it was a little difficult to make everything fit the frame and look balanced). Once I decided on the layout, I used double-sided tape on the backs of each tile to adhere them to the background and placed them in the frame. Fortunately, the Scrabble tiles are thin enough that everything fit perfectly and I was even able to keep the glass on the frame (which I had not originally expected!). I had so much fun making one for my house for my husband and I (above), that I decided to make one for my brother as a house-warming gift.


Frame made for my brother and his family
 

Cutest litte guinea pig I ever did see!

The only thing more fun than making crafts?!?!?! Watching the recipients of the crafts put them to great (and in this case, adorable) use! Here are two pictures of my precious nephew, Royce modeling two of my creations. How cute is he?????

Coming home from the hospital in his bowtie onesie

Modeling his "mustachifier" for Aunt Shannon


Monday, December 5, 2011

How To: Scrabble Tile Pendant-Autism Awareness

Autism Awareness Scrabble tile necklace

So, I tend to develop a new, craft-related obsession every few weeks, whether it be a new craft material I’ve discovered or an awesome project I’ve found online (this is the part where I plug www.pinterest.com once again!). This week, my obsession is SCRABBLE TILES!!! Who knew you could do so much with game pieces and some craft materials (which I happen to have a few of)! My first Scrabble tile-related craft is a pendant.
As a teacher of children with Autism, I not only have the privilege of working with some amazing kids, but also with incredibly dedicated, caring, and gifted adults. In my classroom, I have three other women who work with me on a daily basis which (just ask my husband) isn’t always easy. Despite the challenges that our students present, these women handle every situation with positivity, humor, and grace. When it came to figuring out appropriate Christmas gifts to give them, I knew it had to be something appropriate to what we do on a daily basis and made with love.
The fantastic thing about Scrabble tile pendants is that you can virtually use any picture of your choosing as the centerpiece of the jewelry. Since the symbol for Autism Awareness is a multi-colored puzzle piece, my choice of picture was simple.
Here are the instructions to make your own:
Materials
*Square bail plate (sized a little smaller than a Scrabble pendant)
*Scrabble tile
*Picture printed and cut out to fit Scrabble tile
*Modge Podge
*foam paint brush
*necklace chain

Directions
1. Using a very sturdy, craft epoxy (Tacky glue or a hot glue gun simply won’t cut it, folks!), glue the bail plate (I bought mine in a pack of four at Hobby Lobby) to the lettered side of the Scrabble tile. Let dry overnight.


2. Print out an image of your choice to fit the blank side of the Scrabble tile. Note: An average Scrabble tile is 2 cm. x 1 ½ cm, or .75 inch  x .83 inch and cut out.


3. Using your foam brush, brush a layer of Modge Podge onto the blank side of the Scrabble tile.


4. Adhere your picture to the Scrabble tile. Give it a few minutes to dry a bit so that it does not slide all over the pendant for the next part.
5. Paint a heavier but consistent level of Modge Podge over the top of your picture. Let dry and paint on another layer.
6. After the pendant dries, spray an acrylic sealer over the picture-side of the pendant
7. Once the pendant is completely dry, string the necklace chain through the loop at the top of the pendant.

Voila! Easy breezy!!! PS-If you know any of my classroom assistants, mum’s the word until Christmas!

Wednesday, November 30, 2011

Mickey Mouse Clubhouse Toodles Pillow


Derek's Toodles pillow-front view

Check out my Etsy Shop to purchase a Toodles pillow similar to the one shown!

When my sister-in-law, Jen asked me if I could make my nephew, Derek a Toodles pillow (based on the Mickey Mouse Clubhouse character), I immediately agreed that I would try. Little did she know, I had NO idea whether or not I could actually pull it off or how I would even begin! But, for Derek, I was sure willing to give it my all. I started by drawing out a Mickey head and ears on paper as a template then traced it onto two pieces of red felt. After cutting out the felt, I began to cut the pieces to be placed onto one piece of the red felt and (slowy but surely!) hand-stitched them on. I then cut out a half circle of red felt about the same size of  the head to create a pocket for Derek to put the extra pieces I would be making him into and pinned it to the red felt cutout opposite to the hand-stitched one. Placing the sides of the red felt that I wished to be the outside of the pillow together, I pinned the pieces and sewed along the edges, leaving about a 2 inch gap for stuffing. After turning the felt inside out, I stuffed it with Poly-fil and sewed the open edge shut. I then cut out purple, blue, green, and orange felt "wedges" that Derek would be able to manipulate on top of the Toodles pillow (You really must watch Mickey Mouse Clubhouse to truly appreciate all of Toodles' accessories). Using iron-on decals, I printed a picture for each wedge and ironed each on to complete my pillow. Needless to say, I was pleasantly surprised at how the pillow turned out and was so happy to see the joy on my nephew's face when he opened it! Mission accomplished!!!

Note: I have made an Etsy-version of this pillow for purchase. Please visit my page HERE!!!


Pocket view
 
Toodles "accessories" for Derek to manipulate


The grateful birthday boy giving me the "extra large" hug!


Wednesday, November 23, 2011

Light-Up Ribbon Vase Turkey


HAPPY THANKSGIVING!!!

Here are instructions for one of my favorite craft projects. This light-up turkey was created out of objects purchased at the Dollar Tree and entered into their Flair for Crafts contest last year. I had such a blasty-blast taking trips through the store and brainstorming various ideas for projects that it inspired me to create many, many other Dollar Tree-inspired crafts. Mark my words, there will be a book someday!!!
Materials Needed:
-scissors     
                                      
-1/2” width red ribbon spool                      
-1 ½” width brown ribbon         
      
-glue gun and sticks
-1 ½“ width orange ribbon     
        
-battery-operated light strand
-pipe cleaners                       
        
-large google eyes
-glass vase

Instructions:
1.    Wrap brown ribbon around the glass vase in a criss-cross fashion, adding dots of hot glue to secure

2.    Cut two “wings” out of brown ribbon and glue to the sides of the vase.

3.    Using the brown and orange ribbon, cut four feather shapes out of each color. Cut pipe cleaners to the length of the feathers and glue along the middle of each “feather” so that they are now sturdier and more flexible

4.     Fan out the brown and orange feathers and glue towards the opening of the vase on the side that you have designated to be the back of the turkey.


5.   Using the orange ribbon, cut off a 4” piece and fold in half without creasing. Glue the ends of the ribbon together to form the turkey’s “bead” and glue the opposing end of the ribbon to the front of the vase near the opening.

6.    Fold and glue red ribbon into “B” shape and glue beside the beak for the “gobbler”

7.    Glue google eyes toward the top of the vase

8.    Place the battery-operated light strand into the vase and watch it glow!!!

Ribbon Turkey Hair Clip

To celebrate the Thanksgiving holiday, here is an idea for a turkey hair clip for all you fancy and festive girls out there!

Materials

-alligator clip
-small, googly eyes
-brown, orange, red, yellow, and green ribbon (1/4")
-lighter to avoid ribbon fraying
-glue gun

1.Line a basic, alligator clip with brown ribbon using a glue gun.

2. Using brown ribbon, glue one large and one small loop to the front of the alligator clip, leaving room behind the loops for the "feathers."

3. Cut about 3" piecesof orange, red, brown, yellow, and green ribbon. Loop the pieces ribbon as shown in the above picture and glue behind the turkey body (in whatever order your little heart desires!).

4. Glue two, small googly eyes to the outside of the small loop representing the turkey's head

5. Fold a small piece of orange ribbon in half, gluing the open edges together to form the turkey's beak. Glue below googly eyes.

6. Using a small piece of red ribbon, curl it into a circle and glue at the ends. Glue the circle below the turkey's beak to form it's "gobbler."

7. Using two, small pieces of orange ribbon, cut a "V" shape out of the ends of each piece to form the turkey's "feet." Glue these pieces to the bottom of the turkey body, one on each side.

8. Using a lighter, burn carefully along the frayed edges of the turkey's feet to avoid further frays.

Keep in mind that this type of clip can be worn by itself, in a pair, or on a headband for extra pizzazz!!!

Have a blessed Thanksgiving filled with friends, family, and reflection!!!

Tuesday, November 8, 2011

Save a Stained Shirt with Fabric Flower Embellishments


Anyone who knows me is well aware of what an extreme klutz I am! Enter brand new striped shirt combined with spaghetti for dinner as Exhibit A. I attempted a Shout wipe, then a pretreater and wash, then repeated the process a few more times before almost giving up on the shirt completely. When laundering failed me, I resorted to my love of crafts and making old (and in this case, stained) things new! I got out pieces of fabric that complimented the colors of the shirt and ripped them into long strips. I rolled the and glued the strips into fabric roses (instructional video linked below), embellished them with pearls and stitched them onto my shirt directly on top of the stupid stain. Conclusion: Stains are no longer my enemy. They are just another fabulous excuse to craft!

http://www.youtube.com/watch?v=dhjWbV7TMPY&noredirect=1

Thursday, October 13, 2011

Sweet Treats Baby Shower Theme

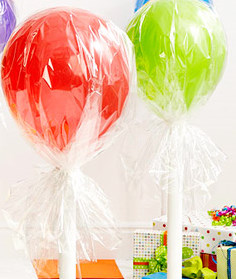
A fantastic example of balloon lollipops, courtesy of  holymamablog

An example of balloon candy courtesy of ohdeedoh.com

Here are some instructions for “candy” or “sweet treat” themed parties. My sister-in-law’s baby shower was themed “Sugar and Spice” in honor of her upcoming baby girl, so this idea worked out perfectly.
Balloon Lollipop Instructions
Materials:           
-balloon
-Saran Wrap or shrink wrap
-curling ribbon
-paper towel tube
-scissors
-tape
 Instructions:
1. Blow up medium-sized balloon.
2. Tape the bottom of the balloon to the opening of the paper towel tube to secure
3. Place a sheet of Saran Wrap over the entire balloon, leaving additional wrap at the bottom of the balloon
4. Using curling ribbon, tie it around the bottom of the balloon, securing the Saran wrap. Curl the access ribbon using your scissors. Curling ribbon can also be used to wrap around the paper towel tube to make it more decorative.
Our decor for my sister-in-law's shower ("candies" are on tables and "lollipops" are on the wall)


Balloon Penny Candy Instructions
Materials:
-balloon
-Saran wrap
-curling ribbon
-scissors
Instructions:
1. Blow up balloon
2. Placing the balloon in the center of a long piece of Saran wrap, roll the wrap around the balloon, covering the balloon entirely with Saran wrap and leaving excess on each side of the balloon.
3. Twist the access Saran wrap on each side of the balloon and tie curling ribbon around the sides. Curl access ribbon using scissors


sheekshindigs.blogspot.com gives an adorable play on balloon lollipops


Tuesday, October 11, 2011

Children's Magnetic Bedroom Message Board

Magnetic sign for my niece, Adrienne

This is a really cute and SUPER easy project to make yourself for a child’s room, or have your child make it! I found really nice rectangular and oval metal serving trays at Dollar Tree that I decided to use as the base of the room sign. Using about nine inches of ribbon, I used a hot glue gun to glue the ends of the ribbon about four inches apart on the back of the serving tray. I then cut a piece of felt to fit the back of the serving tray and glued it (to avoid leaving marks on the wall). While you could easily purchase magnetic letters, I happened to have a ton of foam letters leftover from a project I had completed ages ago, so I put magnetic pieces on the backs of those letters to use on the room sign, instead. The magnetic letters can be moved around to say whatever message the child wants to state.

For my niece Alison's room. Yes, I am aware there is an apostrophe missing. It bothers me, too! I ran out!

Ditto on the apostrophe thing

A rectangular serving tray was used for my nephew Derek's room sign


He's a bit of a Yankees fan!


Sunday, October 9, 2011

How To: Shrink Plastic jewelry


Remember Shrinky Dinks??? They’re not just for summer camp and sleepovers anymore, folks! I desperately needed a pair of Steelers earrings for a game I was about to go to, so I decided I would attempt to make them using the Shrinky Dink film I had recently purchased for funsies! Using permanent markers, a hole punch, and my oven, I created a pair of cute and game-worthy Steelers earrings in less than fifteen minutes!


Here are the instructions:
Materials:
-Permanent markers (I used red, yellow, blue, and black in standard tip and a black, fine point)
-Hole punch
-Shrinky Dink film
-oven
Instructions:
1. Preheat oven to 325 degrees.
2. Print out Steelers logo (I simply searched “Google Images” and enlarged it as needed) Note: Make sure the logo you choose is approximately 4-5 times the size of the finished product, as it will shrink significantly.
3. Placing the Steelers logo under the Shrinky Dink film, use permanent markers to trace and fill in the logo onto the film. You will obviously be making two of these to have a complete pair of earrings (unless you’re going for the pirate or Mr. Clean approach, in which case one is plenty!).
4. After the ink has dried on the film, cut out the logos, leaving extra room at the top of the logos as needed where you  wish to make holes
5. Use the hole punch to create a hole at the top of both logos
6. Place your completed logos on a wax paper-lined cookie sheet and bake for about 3 minutes.
7. Remove the cookie sheet from the oven and let the pieces cool
8. After pieces are cool, use needle nose pliers to attach an ear hook wire to each logo

Another example of jewelry made using Shrinky Dinks

How can I make Steelers earrings without repping for the Penguins, too?


Some festive Shrinky Dink earrings for Fall


Thursday, October 6, 2011

Washcloth Boo Boo Bunny

A child's BFF
“If a boo-boo has you feeling crummy,
Stick an ice cube in my tummy.
Hold it to your boo boo tight,

Soon everything will be all right!”
I was first introduced to boo-boo bunnies when my siblings and I were in preschool. My sister’s classroom teacher made them for all of her students, and, as soon as one came to our house, the fighting immediately ensued. We could not get enough of it and, despite the fact that it was simply a washcloth decorated and folded in a way that made it look like a rabbit that could hold an ice cube, it “magically cured” any minor scrape or bruise acquired where other healing remedies failed. Now, the boo-boo bunny legacy lives on, as I have been making them with and for my preschool students, Girl Scouts, nieces and nephews, and any child I have remote contact with! If you are not familiar with boo-boo bunnies, you’re in for a real TREAT! It’s easy for kids to make (with a little adult help with tying and perhaps rubber-banding). Here are the steps to make your own “magically healing” bunny!

The best (and most visually helpful) instructions I have found for making Boo-Boo Bunnies


Wednesday, September 28, 2011

Bent Wire Name Photo Frame


Wire name frame

A little over ten years ago, I had the fabulous opportunity to visit London, England for about a week! It was absolutely fantastic, and I am DYING to go again! One of my favorite memories was of the day we spent exploring Covent Gardens, near the “downtown” area of London, and its surrounding areas.  While I thoroughly enjoyed the shopping and sight-seeing, I LOVED observing the various entertainers and street vendors, from human statues to musicians to CRAFTERS!!!
Human "Statue" at Covent Gardens-One of the MANY amazing entertainers!

Picadilly Circus-so busy yet so fabulous!

My sister and I-typical tourists

One of the street vendors made the coolest name frames, where he used pliers to bend wire into a variety of words. He charged one pound per name, so I quickly wrote down the names of about 12 of my friends and handed over my money. The name frames were a huge hit and an amazing souvenir to own! Ten years later, I have FINALLY taken the time to try this project for myself.  I certainly did not do it at the speed of the street vendor (or even come close, for that matter), and it definitely took me a few tries before I became successful, but I was pretty proud of the end result.  I simply used needle nose pliers to twist wire into my name and made a two triangular shapes behind and below my name to hold a picture. DONE!!!


The artist himself