Thursday, February 27, 2014

Lego Ring

In celebration of The Lego movie, in theatres now, I thought I would put together a cute and simple, Lego-inspired craft. In looking through my small, Lego collection, I discovered the coolest-looking. Lego guy I have ever seen! This guy's awesomeness is three-fold, really. 1. He wears a monacle, 2. His mustache is bigger than the rest of his face, and 3. Two words...Peg! Leg! As soon as I saw him, I knew I needed to use him.

Using a strong epoxy (in my case, 9001), I placed a small amount of glue onto a ring base and glued the back of the Lego man to the base.
The ring will need about 24 hours to dry completely, but that is all you need to do! A perfect accessory for the movie and for funsies whenever you feel like it!


Sunday, February 23, 2014

Dental Health Month Activity for Kids

Did you know that February is Dental Health Month? Not that we shouldn't be worried about our pearly whites every month of the year, but I tend to stress it pretty heavily in my classroom throughout this month in particular. Here is a really cute activity I use in different variations each year with my classroom and, now that I have a little one of my own who is old enough to use it, at home, too! Its super simple and lends itself really well to a lesson on plaque and why using a toothbrush thoroughly is the only way to remove it successfully! Aaaand it gives me an excuse to drive everyone bonkers with the "Brush Your Teeth" song I'm sure you know from your childhood. "When ya wake up in the morning, it's a quarter to one and you want to have a little fun, ya brush your teeth, ch ch ch ch ch ch ch ch!" Everybody..."ch ch ch ch ch ch ch ch!" Here's how this activity is created...

Materials:

-white cardstock
-scissors
-pink construction paper (could be any color, but I liked the color of gums!)
-tape
-contact paper
-dry erase marker
-toothbrush

Instructions:

1. Cut 5 teeth out of white cardstock (I just sort of guessed as I cut, because teeth come in all shapes and sizes!)
2. Tape teeth to construction paper

3. Cover teeth and construction paper with contact paper and trim
4. Using a dry erase marker, color in "plaque spots" on each of the teeth in various spots.

5. Children take turns using a toothbrush to "remove the plaque"
A Vis a vis marker could also be used to emphasize the importance of using water when brushing your teeth and rinsing at the end of a good brush.

Happy Dental Health Month, Everyone!!!

Tuesday, February 18, 2014

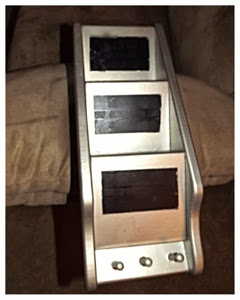
Chalkboard Mail Sorter


One of my New Year's resolutions for this year was to GET ORGANIZED! The first week of January, I found myself making lists, organizing closets, creating calendars and agendas...you name it, I attempted to organize it! While most of my organization has fallen (tremendously) by the wayside, I am super happy with the way this revamped, wall organizer turned out and continue to use it on a regular basis (as does my husband...which makes this a true miracle)! 
I found a mail sorter in excellent shape (but about as outdated as bellbottoms) at my local thrift store, similar to the ones shown above. With a little love and a lot of spray paint, I think I've successfully been able to welcome it into 2014. Here's how...

Materials:

-hanging wall organizer
-sand paper
-spray paint in the color of your choice (I used a Krylon shade of gray)
-Krylon, chalkboard spray paint
-painter's tape

Directions:

1. Use sand paper to rough up organizer

2. Spray the organizer with two coats of chalkboard paint, aiming primarily toward the middle sections, as those will be the sections that can be written on. You may have noticed that I attempted to paint the organizer gray first. Ooops! Do as I say, not as I do (thanks for those gems of wisdom, dad)!
3. After the paint had dried, place painter's tape over the three, middle sections of the organizer, creating rectangular shapes (mine were about 2"x4" but will vary depending upon your findings).

4. Spray the organizer entirely with two coats of gray paint.

5. Once the paint is completely dry, hang and label accordingly. I decided mine would best be used for writing utensils, bills, and mail.

Here's to any and all attempts at organization in 2014!!!


Huge Giveaway!!!

I am soooooo excited to tell you that the wait is over! The giveaway I've been hinting around at is FINALLY here, and it is SPECTACULAR!!!

I have teamed up with some awesome blogger friends to help celebrate the 1st Blogiversay over a
Coffee With Us 3!!! In celebration of this awesome occasion, we are giving away a HUGE present...$300!!!

In case you missed that, that's 300 bucks, clams, greenbacks, George Washingtons...for you to spend on whatever your little heart desires!

 Here are the incredible bloggers involved in this spectacular giveaway, so please take a second to check out their blogs and let them know who sent you! Once you've done that, scroll to the bottom of the page and get yourself entered in the Rafflecopter giveaway using the link below. Good luck!!!


Frugality Gal
Jazmin at Frugality Gal

Smile and Write
Shannon at Smile and Write


Hoyby Crafts
Shannon at Hoyby Crafts

 JaseysCrazyDaisy
Jasey at Jasey's Crazy Daisy

And now, the giveaway!!! Good luck everyone!

a Rafflecopter giveaway If you have any questions, let me know! Thanks again! Jamie -- Coffee With Us 3 Blog, Facebook, Twitter Pinterest & Google+

Sunday, February 16, 2014

Mickey Mouse Gift Bucket

My sweet nephew, Royce is obsessed (actually...what do you call the level beyond obsessed??? He's that!) with Mickey Mouse and the entire Clubhouse gang, so I knew I would need to theme his birthday gift accordingly. After purchasing Mickey-themed letters to spell his name and making him a Toodles pillow, I just needed a container in which to put these gifts. I found a cute, red bucket at the Dollar Tree and jazzed it up using felt and a low-temp, glue gun to make a personalized, Mickey Mouse gift container that can be used again and again! I'm also including a printable for you to use to make one of your very own. Here's how...

Materials

-red bucket
-straight pins
-yellow, black and white felt sheets
-fabric scissors
-low-temp glue gun-glue sticks
-adhesive felt letters
Instructions

1. Print out template, cut out shapes and pin to coordinating felt sheets

2. Using a low-temp glue gun, glue buttons to the middle of the bucket, about an inch apart.
3. Glue feet to the bottom of the bucket so that they are sticking out about 3" beyond the bucket
4. Glue ears to top of bucket so that 3-4" of felt stick up above the bucket
5. Adhere letters to top rim of bucket. Using a black, permanent marker, draw four "button holes" in the middle of each button.

From start to finish, this project took me about 20 minutes. How awesome is that?!?! Enjoy!

Sunday, February 9, 2014

Inexpensive, Last Minute Valentines with Printables

Here is a roundup of the valentine ideas I've created this year, in case you're still looking! Oh, and I should also mention that each comes with a free printable to make things super easy on you! Simply go to the link under the picture of the Valentine you'd like and click on the printable link within the post. Happy V-day!!!


Sunday, February 2, 2014

"You're the Tops" Spinning Top Valentine

Here is yet another non-candy, valentine for your child to pass out. In fact, I will be passing these out to my amazing students, who can't enough of these super shiny, uber-fast tops! Oh, and did I mention the printable can be downloaded RIGHT HERE? Doesn't get any easier than that, folks! Enjoy!
Materials:

-shiny tops (sold at my local dollar store 6 for $1...Whoop!)
-cellophane bags
-cardstock
-scissors
-stapler/staples
Instructions:

1. Cut about 3" off of the top of the cellophane bag and place a top inside

2. Print out "You're Tops" design on cardstock
3. Cut off excess card stock and fold in half
4. Place folded cardstock at the top of the cellophane bag and staple in place