Wednesday, October 22, 2014

Frozen Birthday Party


I have no idea how, but, before my very eyes, my sweet niece Camdyn is turning 4! Crazy!!! Like most four-year-old girls her age, she is completely obsessed with Frozen, so her party theme was a no-brainer. What was not so simple, however, were all of the little details her mom put into this adorable party for all of us to enjoy! Check out all of the funsies in the pics below...
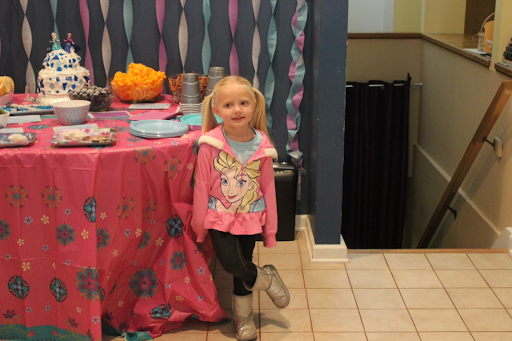


The almost four-year-old humoring her aunt by taking a picture by her food table


Drink options included "Melted Olaf" (aka-ice water) and "Melted Snow Monster" (a fun and fizzy blue concoction that was quite tasty)


Frozen snow castles created by pouring water and food coloring into beach pails, freezing them and placing them on a cotton ball-covered cookie sheet


Each food item offered went along adorably with the theme! Sno-Cap candies became the Snow Caps of Arendale, Anna and Elsa's kingdom


Green rock candy resembled Anna's frozen coronation gown


Blue and clear-colored rock candy on a stick served as Elsa's frozen fractals all around


No party is complete without powdered donut holes, aka "Snowballs"


Chicken and ham salad sandwiches were served as the main entreƩ and went along with Anna and Hans' favorite food choice


Who doesn't love frozen grapes???


Pretzel sticks were adorably labeled "Sven's antlers" to pay homage to everyone's favorite reindeer (besides Rudolph, that is).


And let's not forget everyone's favorite character, Olaf and his removable (cheese puff-like) nose


The pretty birthday girl posing by her Olaf poster...


My sister-in-law frosted a Blue Velvet (for obvious reasons) cake and embellished it with beautiful, blue, rock candy and Frozen character figurines


How cool is that light-up birthday candle??? And how sweet is that birthday girl?


Playing "Pin the Nose on the Olaf"---stiff competition


The bar has been set very high for Frozen-themed parties after this little shindig!

Simple, Embroidery Hoop Pumpkins


Here's a fast and super simple project you can finish just in time for Halloween! And the best part is you can keep it up through Thanksgiving to give your house that great, fall feel! Chances are also good that, if you're a craft nerd like me, you probably have all or most of the materials required to create this project! Check out the tutorial below to get started...


Materials:

-embroidery hoops-I used three different sizes, 6", 8" and 10"
-fall or orange fabric cut into squares slightly larger than the corresponding hoops
-green raffia
-2 feet of ribbon or fabric strip
-glue gun and sticks


Instructions:

1. Place the fabric square on top of the inner ring of the embroidery hoop (aka, the one without the metal parts) so that it is completely covered.
2. Place the outer ring on top of the fabric and inner ring and tighten using the screw at the top so that fabric is taut.
3. Repeat this process for the two remaining rings.
4. Trim the excess fabric from around the ring so that no extra fabric remains.

5. Tie about 4 strings of raffia around the tops of each embroidery hoop into a bow.


6. Lay the fabric strip or ribbon across the backs of the embroidery hoops with 2-4" in between each hoop. Leave about 5" above the smallest hoop to create a loop from which to hang the decoration. Glue the fabric strip or ribbon to the backs of each hoop and at the bottom of the loop.
P


Hang and enjoy!

Happy Halloween, goblins and ghouls!!!


Friday, October 10, 2014

Children's Jack-O-Lantern Painting


With baby #2 on the way, I have had virtually no energy to do anything once I get home from a long day of work. Poor Claire has been a trooper when I explain to her that mommy needs to lay down a little and watch her play, or must her chicken nuggets yet again for dinner because I have no energy to cook! Now that I am starting to feel a little (and I mean a little) less exhausted, I finally broke down and bought her the art supply she's been requesting for longer than I care to admit (the thought of setting up, taking down and the potential mess were all just too much for this preggo to handle in the first trimester)...paint! 2 packs of watercolors, 1 set of finger paints, brushes, a Mickey Mouse poster paint kit, paper, and one, giant, drop cloth later, and we were on our way!


Once we arrived home, it was on! I grabbed an old shirt of mine for Claire to use as a smock, covered everything within a 3-mile radius in a drop cloth and let her go to town. After finishing her Halloween-themed, Mickey Mouse posters, she used the leftover paint to decorate a white, baby pumpkin we had recently purchased. A word to the wise...teaching a toddler that she must wait for paint to dry before touching and playing with the completed 
projects WILL result in multiple meltdowns. The sooner you accept it, the easier it becomes!

Finger painting was our final endeavor of the evening. We worked on mixing colors to make other colors and used the orange we created to spread and play with the paint. I helped Claire use her fingers to trace jack-o-lantern eyes, nose, and a mouth and placed it in a safe place to dry.  The following day, I knew I wanted to use her creations as Halloween decoration and decided to tweak her finger painting a bit to be able to display it proudly year after year.


I used a green, chevron, piece of cardstock I had in my stash and traced a pumpkin shape on the back of it in pencil. Using scissors, I cut out the pumpkin shape. 


Double-sided tape allowed me to adhere the pumpkin cutout to the finger painting, so that the jack-o-lantern face was centered nicely. 


I trimmed the excess paper from the finger painting and cut down the chevron paper to make it fit an 8x10 frame. Once placed in a cute frame, the project was complete!   


I do believe this will be a household staple for every Halloween and Fall for many years to come!