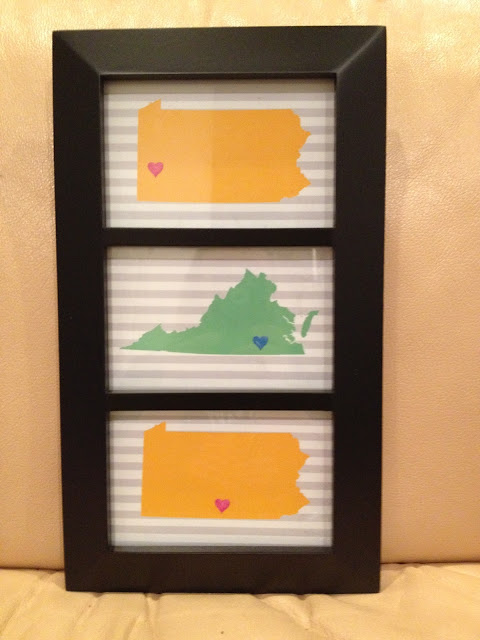
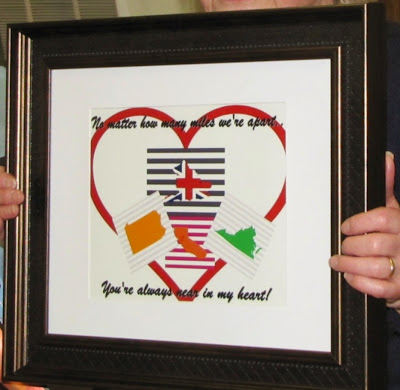
Here is an awesome idea for a mother whose children are all grown up. My amazing sister created my mother (above) and grandmother (below) both of these projects by printing pictures of states and countries onto decorative paper and designating the specific location in which each child resides with little hearts. She then placed the pictures in decorative frames to give as gifts. My mom's frame represents each of her children, beginning with me, the oldest (and wisest) of her children, who lives in Pittsburgh, PA. My middle-child, sister lives in southern Virginia, while my baby bro resides in our hometown of Chambersburg, located in south central PA. My grandmother’s frame is representative of her family members, who reside in Pennsylvania, Virginia, California, and her beloved England. Grandma received this gift for her 80th birthday and was very touched at its sentiment. A simple, yet extremely special and sentimental idea for the women we love this mother's day…well done, sissybabes!!!
Tuesday, April 30, 2013
Wednesday, April 24, 2013
Rustic Tree Trunk Candle Holder
 |
| The gorgeous tablescape |
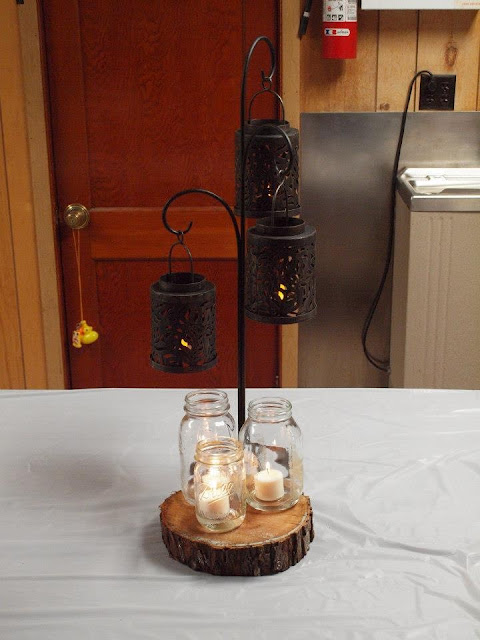
When I attended my cousin Sarah's 30th birthday party in February, I had no doubt I could count on three things: good music, good food, and good people. Little did I know that my aunt and uncle would also throw in some awesomely crafty centerpieces and decor, as well! They went above and beyond to set up the tables at the party. For the center of the centerpiece, My uncle, Kevin cut each of the logs and branches out himself and hollowed out each of their tops large enough to fit a tealight. Using logs of three different lengths, my aunt, Rita adhered them together with a very strong epoxy and tied brown and green twine around them. Thankfully, she allowed me to take one home with me, as I fear I would've snatched one up with or without permission! As if that wasn't enough, Kevin also cut holes into smaller pieces of log to turn them into faux flower vases (I also currently own one of these in my household...thanks, Uncle Kev!). Rita also used white, cupcake liners (and lots of 'em) to create the adorable bouquets that sat atop glass bowls and battery-operated tealights. The party was a wonderful time, and the birthday girl made 30 look good; however, now the pressure is on for all future parties to come. Can't wait to see what kind of creation they hold...
 |
| Another view of the decor |
 |
| Centerpiece for the gift table |
 |
| The yummy and super-creative appetizer table |
Labels:
branch,
candle,
candle holder,
centerpiece,
cut,
decoration,
decorative,
logs,
party,
rustic,
tree,
trunk,
wooden
Monday, April 22, 2013
Chalkboard Coasters
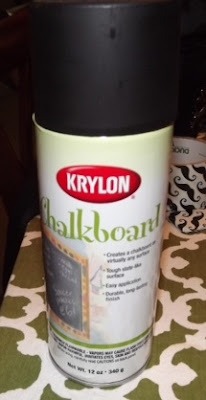
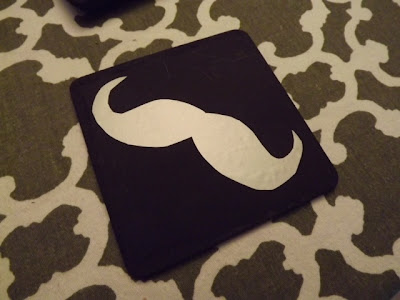
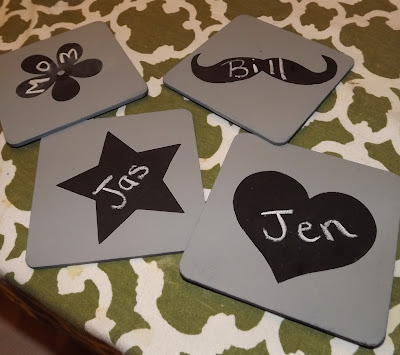
My current craft obsesh is chalkboard paint, and I have been using every excuse imagineable to use it on every item under the sun (some are successful projects, while others are epic fails...either way, good times)! In the case of this project, I can't wait to use these sweet coasters for guests at our next sha-bang! Now I just need to find an excuse to have a party...
Here's my tutorial for these amazeballs chalkboard coasters!
Materials:
-coasters (I bought mine in a pack of 6 for $1 at my local craft store)
-chalkboard spray paint
-shape stencils or vinyl (I used my Cricut machine to cut out shapes in adhesive vinyl)
-spray paint of any color
-drop cloth or old sheet
-chalk

Instructions:
1. Place coasters onto drop cloth outside or in a well-ventilated space
2. Spray two coats of chalkboard paint onto both sides of coasters
3. After paint is dry, adhere stencils to coasters. I chose a variety of shapes but am particularly partial to the mustache!
4. Return coasters to drop cloth and spray two coats of spray paint onto the front and back of each coaster (I chose gray because I had it on hand).
5. After the paint dries, carefully peel off stencils.
Saturday, April 13, 2013
Brag Time
Have I mentioned how much I love crafty people? My cousins, Kristin and Katelyn made THE COOLEST gift for their sister, Danielle, who is getting married June 1st. Danielle's future last name is going to be "Wissler," and her fiance is quite the beer aficionado, so her brilliant sisters enlisted the help of some other family members in order to create this phenomenal coffee table, decorated entirely with beer bottle tops shaped into the letter "W." How flipping cool is that?!?! Perfect for them and their future household! I can't wait to watch Danielle marry her best friend and begin a wonderful life with him in a little over a month!
Wednesday, April 10, 2013
Mustache 1st Birthday Bash

 |
| The sweet, handsome birthday boy |
My sweet nephew turned one in September, and it has taken me until now to take the time to edit, post pics, and give this post the props it deserves. The theme of this particular party was "Mustache Bash!" I mean, does it get more amazeballs than that?!?! Here are some handmade highlights from the partay-hey!
Here's the cutie patootie birthday boy, himself in his "throne." My sissybabes ordered his onesie (complete with mustache tie on the front and "Well, if you (mustache) I'm ONE!" on the back) from Etsy.
Royce also had a mustache-shaped cake that he (obviously, from the picture just below) made quick work on chowing down!
The rest of the guests got to nosh on cupcakes embellished with...you guessed it...mustaches, courtesy of my Cricut machine and the "Mustaches and Glasses" cartridge and toothpicks
My sister had been dying to purchase personalized M&M's and couldn't resist buying them for her little man's big day. If you look closely, you will see that the candies are labeled with a mustache, the phrase "Royce is ONE!!!" and his sweet little face! You KNOW you're big time when your face is on candy, am I right???
This might have been my favorite mustache-ification of this party. We used a contraption found online called a "Crustache," which cuts one sandwich into three superb mustache shapes. Who woulda thunk? In the case of Royce's party, the little ones were able to enjoy their ham & cheese and pb&j sammies in style!
Using mustache duct tape (man, I love that stuff), water bottles were wrapped to match the theme
 |
| My crazy aunts, mama, and grandparents participating in Photo Booth funsies |
Certainly, the most entertaining portion of the party was the photo booth. Mustaches and other assorted props were displayed for people to use and pose for the camera that had been set up on a tripod. Good times!!!
 |
| Even my little munchkin was not immune to mustachery! |
Sunday, April 7, 2013
Autism Awareness Puzzle Piece Wreath

April is Autism Awareness Month! As an Autism Support teacher, I recognize the dire importance of helping people understand what Autism is and isn't, not only this month, but as often as I possibly can. Did you know that 1 in 88 children are affected with Autism (1 in 54 boys) and that it affects 2 million people in the US alone? Of the $30.86 BILLION dollars allotted to the National Institutes of Health in 2012, only $169 million went directly to research on Autism. Further proof that education and awareness are key!
My students never cease to amaze me on a regular basis, and I am so fortunate to be their teacher. I feel it is our job to speak out for these individuals, particularly for those that cannot do so for themselves!
To celebrate Autism Awareness month, my students created these puzzle piece wreaths. Autism is represented by puzzle pieces to highlight the puzzle that is the disorder and to honor those working tirelessly to piece things together to determine possible causes, prevention, and methods of treatment. Here are the steps we took to create these awesome decorations that I will hang proudly in my classroom and home in honor of these incredible individuals.
Materials:
-cardboard ring (ours were 10" in diameter)
-light blue construction paper
-scissors
-glue
-large puzzle pieces
-red, yellow, green, and blue acrylic paint
-paint brush
-hole punch
-blue ribbon-approx. 6"
-Autism Awareness ribbon (we found ours in the craft section of Wal-Mart)-approx. 8"
Instructions:
1. Trace the cardboard ring onto the light blue, construction paper
2. Cut along the traced lines
3. Glue the light blue ring to the cardboard ring so that the cardboard is not seen
4. Paint the non-printed sides of 10 puzzle pieces and let dry
5. Glue puzzle pieces around the ring
6. After the glue is dry, use the hole punch to make a hole at the top of the ring
7. String the blue ribbon through the hole and tie both sides of the string together
8. Loop the Autism awareness ribbon and glue to the bottom center of the ring
Please take a moment to look through this incredible website and share it with others, because the more educated we become, the closer we get to putting this puzzle together!
 |
| Hanging proudly in our school's hallway |
Friday, April 5, 2013
Simple Superhero Cape Designs
The son of one of my co-workers recently had unexpected brain surgery to remove a benign (thank goodness) tumor on his brain. All of the reports that we received from my co-worker and his wife mentioned how unbelievably positive and brave their son was throughout the entire process and that he was, without a doubt, their hero. While shopping at Target one afternoon, I came across some superhero capes in the party favors section. I quickly snatched two of them and came home ready to carry out my plan (Mua ha ha ha!!!).
I used blue and yellow felt to cut out two large shapes (a diamond for one and an oval for the other) and some letters (SG for Super Gideon and SC for Super Corbin, Gideon's little brother, who I thought might also like one) and hot glued them to the capes. I found matching masks at my local party store and sent them off to their brave recipients.
Thursday, April 4, 2013
Building Fine Motor Skills
As a special education teacher and a mommy, I feel as though sometimes my life revolves around developing and strengthening fine motor skills. Fortunately for me, I have had the immense priveledge of working with a huge variety of teachers and occupational therapists who have helped equip me with some quick and inexpensive activities to enable little ones to build essential, fine motor skills and have a little fun along the way!
And speaking of cutting, I found these adorable little frog favors for $1at my local dollar store, which would be awesome for kids just learning to hold and use scissors. The little froggy moves up and down with each "Snip!"
When the ability to string large beads onto a pipe cleaner is mastered, move on to smaller beads, followed by larger beads on a string and finally, small beads on the string. I often play activities like this as "making mommy a necklace" or "let's put on this new bracelet you made" to keep the kiddos motivated


For the child who has difficulty "closing" a circle or tends to go around and around and around without stopping, placing a sticker to indicate a visual start and stop point can be a huge help! I personally prefer animal stickers, so they can be encouraged to "Start at the head and stop at the tail." On a side note, if worksheets are laminated or placed inside plastic sheets, dry erase markers can be used and the sheets can be reused over and over again!
Mini-golf, anyone??? Make sure that the next time you go, you snag a few extra tiny pencils. The beauty of these tiny little guys is that children are less likely to grab the pencil in a fisted grasp and are sort of forced to use a more appropriate three-finger (aka "tripod") grasp when writing. Holding a bead or small item in the ring and pinky fingers will also help in encouraging the use of the tripod grasp.
Ice cube trays are another item to add to your list of supplies to purchase, although chances are really good you have spare ones lying around your house. Either way, ice cube trays are PERFECT for little ones to practice picking up small items and sorting them. In the pictures below, an ice cube tray was used to sort these small items by color. As an added level of difficulty, children could use tweezers to pick up small items like the ones below and place them into the tray.
Tongs and tweezer in all shapes and sizes are also excellent fine motor-strengthening tools to use to pick up items. I have often found success having children use them to pick up soft items, such as craft pom poms or cotton balls and gradually fading to smaller, firmer items for a greater challenge.
Everyone has plastic containers they can transform into quick and simple, piggy-bank types of fine motor activities. The idea is to cut a slit in the container lid just large enough for the items to fit through. Buttons are just one example of objects that can be used and are easily accessible.
Additional Fine Motor activities:
-Use thicker paper or cardstock to practice beginning cutting activities
-Highlight cutting and tracing lines to visually support little learners
-Make pasta necklaces
-Purchase, print, or make your own lacing cards using string, a hole punch and a favorite picture or character
-Hide beads inside of Play Doh or putty and encourage children to remove the beads
-Put money into a piggy bank or help mommy and daddy sort coins
-Use a hole punch to practice "making confetti" in a variety of types of paper and cardstock
-Practice writing and tracing with a variety of mediums (pencil, marker, pen, chalk, crayon, dry erase marker, you name it)
-Paint using watercolors
Labels:
activities,
baby,
children,
cutting,
fine motor,
learning,
pincer grasp,
pinch,
skills,
student,
tracing,
writing
Subscribe to:
Posts (Atom)
