Thursday, October 13, 2011

Sweet Treats Baby Shower Theme

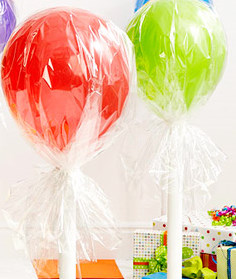
A fantastic example of balloon lollipops, courtesy of  holymamablog

An example of balloon candy courtesy of ohdeedoh.com

Here are some instructions for “candy” or “sweet treat” themed parties. My sister-in-law’s baby shower was themed “Sugar and Spice” in honor of her upcoming baby girl, so this idea worked out perfectly.
Balloon Lollipop Instructions
Materials:           
-balloon
-Saran Wrap or shrink wrap
-curling ribbon
-paper towel tube
-scissors
-tape
 Instructions:
1. Blow up medium-sized balloon.
2. Tape the bottom of the balloon to the opening of the paper towel tube to secure
3. Place a sheet of Saran Wrap over the entire balloon, leaving additional wrap at the bottom of the balloon
4. Using curling ribbon, tie it around the bottom of the balloon, securing the Saran wrap. Curl the access ribbon using your scissors. Curling ribbon can also be used to wrap around the paper towel tube to make it more decorative.
Our decor for my sister-in-law's shower ("candies" are on tables and "lollipops" are on the wall)


Balloon Penny Candy Instructions
Materials:
-balloon
-Saran wrap
-curling ribbon
-scissors
Instructions:
1. Blow up balloon
2. Placing the balloon in the center of a long piece of Saran wrap, roll the wrap around the balloon, covering the balloon entirely with Saran wrap and leaving excess on each side of the balloon.
3. Twist the access Saran wrap on each side of the balloon and tie curling ribbon around the sides. Curl access ribbon using scissors


sheekshindigs.blogspot.com gives an adorable play on balloon lollipops


Tuesday, October 11, 2011

Children's Magnetic Bedroom Message Board

Magnetic sign for my niece, Adrienne

This is a really cute and SUPER easy project to make yourself for a child’s room, or have your child make it! I found really nice rectangular and oval metal serving trays at Dollar Tree that I decided to use as the base of the room sign. Using about nine inches of ribbon, I used a hot glue gun to glue the ends of the ribbon about four inches apart on the back of the serving tray. I then cut a piece of felt to fit the back of the serving tray and glued it (to avoid leaving marks on the wall). While you could easily purchase magnetic letters, I happened to have a ton of foam letters leftover from a project I had completed ages ago, so I put magnetic pieces on the backs of those letters to use on the room sign, instead. The magnetic letters can be moved around to say whatever message the child wants to state.

For my niece Alison's room. Yes, I am aware there is an apostrophe missing. It bothers me, too! I ran out!

Ditto on the apostrophe thing

A rectangular serving tray was used for my nephew Derek's room sign


He's a bit of a Yankees fan!


Sunday, October 9, 2011

How To: Shrink Plastic jewelry


Remember Shrinky Dinks??? They’re not just for summer camp and sleepovers anymore, folks! I desperately needed a pair of Steelers earrings for a game I was about to go to, so I decided I would attempt to make them using the Shrinky Dink film I had recently purchased for funsies! Using permanent markers, a hole punch, and my oven, I created a pair of cute and game-worthy Steelers earrings in less than fifteen minutes!


Here are the instructions:
Materials:
-Permanent markers (I used red, yellow, blue, and black in standard tip and a black, fine point)
-Hole punch
-Shrinky Dink film
-oven
Instructions:
1. Preheat oven to 325 degrees.
2. Print out Steelers logo (I simply searched “Google Images” and enlarged it as needed) Note: Make sure the logo you choose is approximately 4-5 times the size of the finished product, as it will shrink significantly.
3. Placing the Steelers logo under the Shrinky Dink film, use permanent markers to trace and fill in the logo onto the film. You will obviously be making two of these to have a complete pair of earrings (unless you’re going for the pirate or Mr. Clean approach, in which case one is plenty!).
4. After the ink has dried on the film, cut out the logos, leaving extra room at the top of the logos as needed where you  wish to make holes
5. Use the hole punch to create a hole at the top of both logos
6. Place your completed logos on a wax paper-lined cookie sheet and bake for about 3 minutes.
7. Remove the cookie sheet from the oven and let the pieces cool
8. After pieces are cool, use needle nose pliers to attach an ear hook wire to each logo

Another example of jewelry made using Shrinky Dinks

How can I make Steelers earrings without repping for the Penguins, too?


Some festive Shrinky Dink earrings for Fall


Thursday, October 6, 2011

Washcloth Boo Boo Bunny

A child's BFF
“If a boo-boo has you feeling crummy,
Stick an ice cube in my tummy.
Hold it to your boo boo tight,

Soon everything will be all right!”
I was first introduced to boo-boo bunnies when my siblings and I were in preschool. My sister’s classroom teacher made them for all of her students, and, as soon as one came to our house, the fighting immediately ensued. We could not get enough of it and, despite the fact that it was simply a washcloth decorated and folded in a way that made it look like a rabbit that could hold an ice cube, it “magically cured” any minor scrape or bruise acquired where other healing remedies failed. Now, the boo-boo bunny legacy lives on, as I have been making them with and for my preschool students, Girl Scouts, nieces and nephews, and any child I have remote contact with! If you are not familiar with boo-boo bunnies, you’re in for a real TREAT! It’s easy for kids to make (with a little adult help with tying and perhaps rubber-banding). Here are the steps to make your own “magically healing” bunny!

The best (and most visually helpful) instructions I have found for making Boo-Boo Bunnies