Thursday, December 12, 2013

Revamped Stocking Hangers


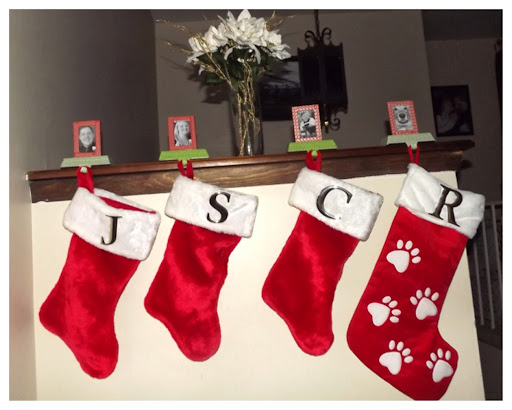
As much as I love my house and am grateful for it, Christmastime makes me realize each year how much I regret not having a fireplace to display stockings, decorations, flowers, etc., not to mention having to eventually explain to Claire how Santa gets gifts into our house without a chimney. Good thing I have some sweet, improvisation skills! I have always wanted to use weighted stocking hangers that can be found at any department or craft store but refuse to pay the prices they typically ask. Fortunately for me, I have a dollar store within 2 miles of my house (Yikes!) and a surplus of craft supplies to adapt my findings. See for yourself...
I found these little gems for $1.00 each and, while they are definitely not my style, I could definitely see their potential, so I got crackin' (literally...I had to really do some breakage to adapt these the way I wanted)!

Materials:

-stocking holders
-washi tape (I used red and green for festive funsies)
-small frames (mine were about 2"x3")
-glue gun/sticks
-scissors

Directions:

1. Remove the decorative tops of the stocking hangers (may need to use some tough love to really get the job done)
2. Wrap washi tape around the base of the hanger, starting with the hook itself. Cover the base with tape entirely, using scissors to cut any excess.

3. Remove backing and glass from frame. Cover the front and sides of the frame with washi tape.
4. Replace glass and back of frame and glue the top of the frame to the base of the stocking holder. Note: The opening of the frame should be available to insert pictures.
Q
5. Print and insert pictures into frames and proudly display!


Sunday, December 8, 2013

Poinsettia Napkin Holders from Shower Curtain Rings

Its the most expensive wonderful time of the year!!!

As much as I love how well my holiday decorations are coming along, I can't get over how quickly their expenses add up! Between the purchase of a pre-lit tree (which I love and don't regrey buying at all), outdoor lighting, wreaths, and lots of odds and ends, I think its safe to say my wallet took a massive beating this Christmas...and that's without adding in the cost of presents! Yikes! Needless to say, I am extremely grateful for projects like this one that add to the seasonal decorum without breaking the bank! Here is how I transformed curtain rings, craft wire, and poinsettias into beautiful napkin rings using washi tape:

Materials:

-curtain rings (I found 12 for $1 at my local dollar store)
-washi tape (PS-Costco is currently selling a washi tape holder and 20 rolls of tape for $19.99! Merry Christmas to me!!!)
-artificial poinsettias
-floral embellishment (I purchased 2 small bundles of frosted berries at Michael's)
-craft wire
-wire cutters
Directions:

1. Wrap washi tape around four curtain rings, covering them entirely
2. Place two small sprigs of frosted berries on each side of a poinsettia and connect using craft wire, making sure to leave a 4-5" tail of wire to wrap around curtain ring
3. Wrap remaining wire around curtain ring, securing the flower to it tightly
4. Cover any exposed wire with additional washi tape
5. Place napkins inside of rings and display proudly!
Wishing you a table filled with family, food, friendship and (as always) fun!!! Happy Holidays!

Jenga Block Christmas Tree


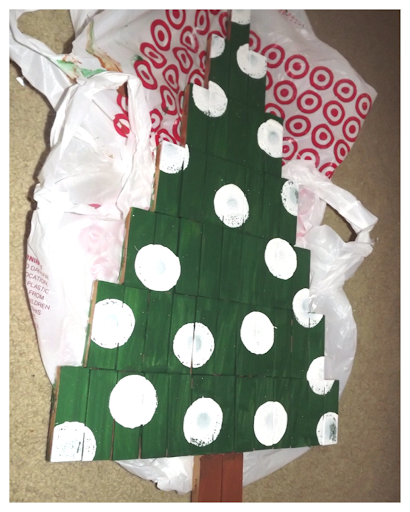
Jenga!!! I used to love playing that game (although I never faired well playing it, as I was the girl who always knocked down the tower AND, as a result, had to be the one to set it back up)! On a recent trip to my local thrift store, I came across a bag of Jenga blocks for $.50 and had to have them. For what? I wasn't sure, but knew I would one day put them to good use! That day is now, my friends! After some time spent arranging and re-arranging, I transformed the blocks into a Christmas tree that I then painted and made into a wall hanging. Love it!!! Here's how you can make one of your own...

Materials:

-Jenga blocks (I used 53 of them!)
-glue gun/sticks
-sandpaper
-acrylic paint (I used a dark green, brown, light green, white, and burgundy, but the options are truly limitless!)
-sponge paintbrush
-circular, sponge brush
-sealant
-ribbon

Directions:

1. Using a glue gun, adhere Jenga blocks using the model below (each horizontal row gains two more blocks than the one above it).
2. Once the glue has dried, sand the surface of the tree to make the paint adhere more successfully
3. Paint the surface of the tree with two coats of dark green, acrylic paint and the "trunk" in brown
4. Once the paint has dried, use the circular, sponge brush to create dots all over the tree with white, acrylic paint.

5. Repeat the process of making dots using the light green, acrylic paint
6. And again with the burgundy paint
7. Finally, add dots of the original green color to the tree to cover up any spots that may have smudged.

8. Spray the tree with a sealant and let dry.
9. Fold a 5 inch piece of ribbon in half and adhere loose ends to the top of the tree, leaving a loop to hang up

Voila!!! Its yours to display proudly!

Thursday, December 5, 2013

Clothespin Wreath and Christmas Card Holder

One of my favorite parts of the holiday season is receiving Christmas cards, particularly picture cards that allow me to see friends and family who are far away and admire how much their children have grown and changed from last year to this year. Unfortunately, after I'm done admiring these cards, they get shoved into a basket with a gazillion others, never to be seen or heard from again! Until now...Using washi tape (my new fave), clothespins and a wire, coat hanger, ribbon, and a lil' bling, I created a wreath that doubles as a Christmas card holder. 'Tis the season to be crafty!!!

Here's how you, too, can make one:

Materials:
  • Wire, clothes hanger
  • Needle-nosed pliers
  • Clothespins (I used a little over 60 of them)
  • Washi tape 
  • Scissors
  • Ribbon
  • Sticky-backed gems


Directions:

1. Place a piece of washi tape top across the flat side of a clothespin. Trim any excess at the ends of the clothespins.

2. Fold excess tape over the sides of the clothespins


3. Shape wire. Clothes hanger into circular shape. Use pliers if needed.

4. After all clothespins are covered, place them onto the open end of the wire hanger through the wire loop in the middle with the side of the clothespin that opens facing upward. I used two patterns of washi tape and alternated them amongst clothespins
5. Using pliers, bend the open end of the wire hanger inward and wrap around the other side. Add sticky-backed gems to the ends of every other clothespin.
6. Wrap ribbon around the ends of the wire hanger and hook. Tie a bow in the front.


HAPPY HOLIDAYS FROM HOYBY CRAFTS!!!!!


2x4 Steelers Snowman

Hi, my name is Shannon...and I'm a craft-o-holic! My husband has been reminding me lately just how out of control my obsesh tends to get in the wintertime and, in looking at my receipts as of late, I must say he's got a point (I hate that)! The solution??? Find random stuff and transform it into something else! I decided to start by using one of the pieces of wood I had recently found in my grandparents' shed. Here's how I turned a boring piece of lumber into a decorative snowman boasting my favorite, football team...

Materials:
-wood of any shape or size
-sandpaper
-white, spray paint
-black paint pen
-spray sealant
-orange felt
-black, permanent marker
-1/4 yard of fleece
-fabric scissors
-glue gun and glue sticks
-buttons or beads (I used plastic, football beads I happened to have on hand!)


Directions:

1. Sand the piece of wood, in order for paint to adhere effectively


2. Spray two coats of white paint, covering the wood completely.

3. Draw eyes and a mouth using a black, paint pen.

4. Spray one coat of sealant over the painted wood and let dry.

5. Cut a carrot shape out of orange felt and add detail using a permanent marker. Adhere to the face using hot glue

6. Cut a 9"x6" piece of fleece and wrap around the top of the wood to create the hat. Hot glue the seam where the fleece overlaps to secure it to the wood. Roll up about an inch of the fleece at the bottom of the hat and glue in place.

7. Cut a thin piece of  fleece about 6 inches long and tie around the middle of the hat. Using fabric scissors, fringe the top of the fabric into about 1/4" strips

8. Cut a piece of 4"x18" fleece. Wrap around the "neck" of the snowman and adhere to wood using hot glue. Cut fringe into the ends of the scarf.
9. Hot glue 3-5 beads or buttons to the wood


There you have it! Success! I just wish I could say the same for the football team it represents. Maybe next season...