Showing posts with label chalkboard. Show all posts

Thursday, July 24, 2014

Chalkboard Frisbee-Air Mail


I'm taking part in an awesome Kids' Crafts Summer Camp series, courtesy of Randi and her blog Sowdering About, along with a crew of other, awesome bloggers. Given four choices of possible materials, I immediately chose "chalkboard," as I have a bit of an obsession with EVERYTHING chalky! One of my favorite summer activities is tossing a frisbee. Its the perfect summer toy...you can take it anywhere easily, play with it in large and small groups, and adults, kids and pets alike love them! Pair that with the fact that I found Americana's clear chalkboard coating on my most recent trip to Michael's, which allows any painted object to become a chalkboard, and I've found my project! In a few, short steps, kids can transform their frisbees into chalkboard score keepers, message boards, and anything their little, creative hearts desire! Here's how...


Materials:

-frisbee
-acrylic paint
-clear chalkboard coating
-chalk
-wet paper towel


Instructions:

1. Paint a thin layer of acrylic paint on the top of the frisbee. After the paint has dried, paint 1-2 additional coats of acrylic paint.


2. Once the acrylic paint has completely dried, paint a layer of clear, chalkboard coating over the acrylic paint. 


3. Once the coating has dried completely, it is time to start writing! I found that chalk markers work more successfully than regular chalk, but both are   
    options. Use the chalk to keep score, write messages, and tell jokes (just to name a few).


Chalk can be removed with a sponge or wet paper towel, which will dry very quickly for reuse!


I would LOVE to see pictures of the chalkboard frisbees you create and all of the creative ways you've come up with to use them! Here's hoping this is your best summer yet!!!


Check out the rest of the Campers for this Summer Craft Camp!


Sunday, June 22, 2014

Chalkboard Bookmark

My incredibly talented sister-in-law has recently published her second book in the "Checked" trilogy. If you have not yet heard about this series, here is a glimpse into what its all about...

"Callie spends countless hours staring at appliances to make sure they are really unplugged. She wastes obscene amounts of time checking for murderers in various corners of her house and entire sleepless nights performing pointless checking rituals. Then every spare minute is filled with inspecting doorknobs, chairs, floors, etc. for minuscule traces of germs. Oh, and she does all of this as she counts to three over and over again in her head. She does this every day. Without fail. 

Dr. Blake just doesn’t fit into her schedule. Until he does. Until Callie begins to trust him. Until she starts to need him. And want him. And . . . "

I know I'm partial, but these books are fantastic and provide an all-too-real look at Obsessive Compulsive Disorder and its effects on those who suffer from it. As a romantic at heart, it also met every expectation I have of a romantic novel and then some. I truly CANNOT WAIT for the final book to come out!!! You can check out THIS LINK to purchase Checked (first novel) and Checked Again (second) for yourself!

As a promotion for these awesome books, I created these chalkboard bookmarks that you can make for yourself in a few, simple steps!

Materials

-mini bookmark (found in the jewelry section of most craft stores)
-chalkboard pendant (Hobby Lobby has just started selling really cute ones!)
-split ring
-needle-nosed pliers
-chalk or chalk marker


Instructions:

1. Using needle-nosed pliers, open split ring and place one end of the ring through the pendant.

2. Place the split ring through the hole at the top of the bookmark. Close the split ring using the pliers.

3. Decorate the bookmark using chalk or a chalk marker (chalk is removed easily using a wet paper towel and drying befor using again!)


Stay tuned for an awesome giveaway in July, where I will be including a chalkboard bookmark like this one, as well as a certain book that shall not be named (but you can probably guess) to place that bookmark inside!


Tuesday, November 5, 2013

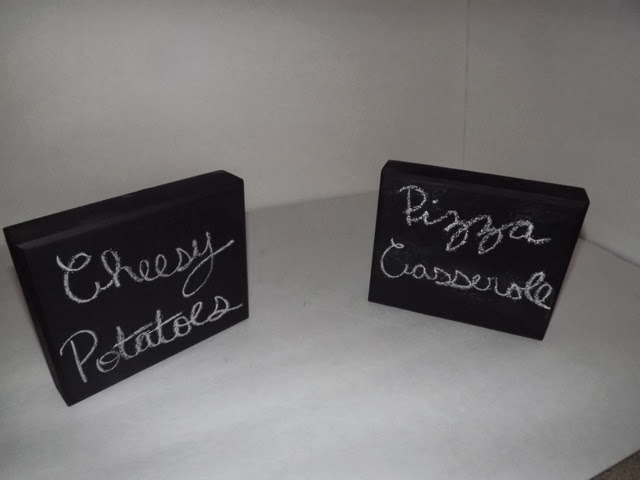
Revamped-Letter Signs to Potluck Labels


Ever go to a potluck dinner where you look at one of the gazillion delicious looking casseroles and say to your husband or friend "What do you think is in that?" I can't even imagine how treacherous these types of meals could be to those with food allergies. How helpful would it be if each bit of deliciousness was labeled appropriately?


Have no fear, the crazy craft lady is here...


I recently purchased a few 5x7" wood plaques at my local thrift store for $.50 each and decided to transform them into Potluck-friendly food displays. I simply sanded the sides and front of the plaques, sprayed two coats of chalkboard paint on them and Voila! The options for these little free-standing plaques are endless---price displays at craft fairs, tic-tac-toe or Pictionary boards for on the go games, scoreboards for sporting events...what else can you come up with???


Friday, July 26, 2013

"I Love You More Than" Chalkboard


And the chalkboard paint obsession continues...

Using a metal, serving tray I purchased at my local dollar store, chalk paint, and a silver sharpie, I created a hanging chalkboard to proclaim my love to my faves by comparing it to some of the greatest pairings the world over (ie-peanut butter & jelly, bagels & cream cheese, etc.). Not one for thinking inside-of-the-box, I would be remiss if I didn't also create some celebrity-related and silly analogies, as well (ie-"I love you more than" Sir Mix-A-Lot likes big butts, Kim Kardashian loves stupid baby names, Anthony Weiner loves camera phones, etc).

Spray two coats of chalkboard paint onto serving tray


Write "I love you more than" in silver Sharpie on the tray leaving plenty of room on the bottom to express your love in chalk.


Express your love in your best analogy


Get as creative as your little heart desires!

Wednesday, June 5, 2013

30 Fab Father's Day Ideas

Lil' Luna recently posted a plethora of amazing Father's Day gifts! Here are some of my faves, but be sure to check out her page for the entire list of projects (all 30 of them!)!


Monday, April 22, 2013

Chalkboard Coasters

coaster, chalk, chalkboard paint, chalkboard, mustache, heart, star, flower

My current craft obsesh is chalkboard paint, and I have been using every excuse imagineable to use it on every item under the sun (some are successful projects, while others are epic fails...either way, good times)! In the case of this project, I can't wait to use these sweet coasters for guests at our next sha-bang! Now I just need to find an excuse to have a party...

Here's my tutorial for these amazeballs chalkboard coasters!

Materials:

-coasters (I bought mine in a pack of 6 for $1 at my local craft store)
-chalkboard spray paint
-shape stencils or vinyl (I used my Cricut machine to cut out shapes in adhesive vinyl)
-spray paint of any color
-drop cloth or old sheet
-chalk
coaster, chalk, chalkboard paint, chalkboard, mustache, heart, star, flower


Instructions:

1. Place coasters onto drop cloth outside or in a well-ventilated space

2. Spray two coats of chalkboard paint onto both sides of coasters

3. After paint is dry, adhere stencils to coasters. I chose a variety of shapes but am particularly partial to the mustache!

coaster, chalk, chalkboard paint, chalkboard, mustache, heart, star, flower

4. Return coasters to drop cloth and spray two coats of spray paint  onto the front and back of each coaster (I chose gray because I had it on hand).


5. After the paint dries, carefully peel off stencils.


coaster, chalk, chalkboard paint, chalkboard, mustache, heart, star, flower

6. Use chalk to label or design coasters in any way your lil' heart desires. I labeled mine according to the peeps using them at the time. Enjoy!

coaster, chalk, chalkboard paint, chalkboard, mustache, heart, star, flower