Showing posts with label tree. Show all posts

Sunday, December 8, 2013

Jenga Block Christmas Tree


Jenga!!! I used to love playing that game (although I never faired well playing it, as I was the girl who always knocked down the tower AND, as a result, had to be the one to set it back up)! On a recent trip to my local thrift store, I came across a bag of Jenga blocks for $.50 and had to have them. For what? I wasn't sure, but knew I would one day put them to good use! That day is now, my friends! After some time spent arranging and re-arranging, I transformed the blocks into a Christmas tree that I then painted and made into a wall hanging. Love it!!! Here's how you can make one of your own...

Materials:

-Jenga blocks (I used 53 of them!)
-glue gun/sticks
-sandpaper
-acrylic paint (I used a dark green, brown, light green, white, and burgundy, but the options are truly limitless!)
-sponge paintbrush
-circular, sponge brush
-sealant
-ribbon

Directions:

1. Using a glue gun, adhere Jenga blocks using the model below (each horizontal row gains two more blocks than the one above it).
2. Once the glue has dried, sand the surface of the tree to make the paint adhere more successfully
3. Paint the surface of the tree with two coats of dark green, acrylic paint and the "trunk" in brown
4. Once the paint has dried, use the circular, sponge brush to create dots all over the tree with white, acrylic paint.

5. Repeat the process of making dots using the light green, acrylic paint
6. And again with the burgundy paint
7. Finally, add dots of the original green color to the tree to cover up any spots that may have smudged.

8. Spray the tree with a sealant and let dry.
9. Fold a 5 inch piece of ribbon in half and adhere loose ends to the top of the tree, leaving a loop to hang up

Voila!!! Its yours to display proudly!

Sunday, July 28, 2013

Quiet Book

Due to my overabundance of felt and love for quiet books (not to mention, quiet!), I decided it was time Claire got her very own quiet book. While she's only one and can only seem to manipulate the pieces into her mouth (she is heavily supervised when using this book, by the way, so not to worry!"), I know it will come in handy for many of the activities where her noisy, rolly, crazy days just aren't acceptable!


Front and inside cover complete with giant pocket to store all the pieces.

Page 1-gumball machine with felt gumballs; Page 2-flower and petals

Page 3-Ice cream cone and scoops; Page 4-Animal beads on ribbon to practice counting and fine motor skills

Page 5-Tree with multi-colored leaves; Page 6-fish tank with felt fishies to practice color recognition


Wednesday, April 24, 2013

Rustic Tree Trunk Candle Holder


tree, trunk, candle holder, rustic, centerpiece, vase, wood
The gorgeous tablescape
 

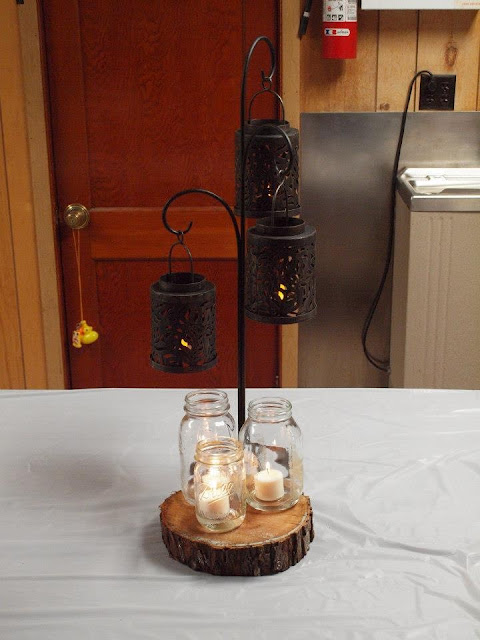
When I attended my cousin Sarah's 30th birthday party in February, I had no doubt I could count on three things: good music, good food, and good people. Little did I know that my aunt and uncle would also throw in some awesomely crafty centerpieces and decor, as well! They went above and beyond to set up the tables at the party. For the center of the centerpiece, My uncle, Kevin cut each of the logs and branches out himself and hollowed out each of their tops large enough to fit a tealight. Using logs of three different lengths, my aunt, Rita adhered them together with a very strong epoxy and tied brown and green twine around them. Thankfully, she allowed me to take one home with me, as I fear I would've snatched one up with or without permission! As if that wasn't enough, Kevin also cut holes into smaller pieces of log to turn them into faux flower vases (I also currently own one of these in my household...thanks, Uncle Kev!). Rita also used white, cupcake liners (and lots of 'em) to create the adorable bouquets that sat atop glass bowls and battery-operated tealights. The party was a wonderful time, and the birthday girl made 30 look good; however, now the pressure is on for all future parties to come. Can't wait to see what kind of creation they hold...


tree, trunk, candle holder, rustic, centerpiece, vase, wood
Another view of the decor


tree, trunk, candle, candle holder, centerpiece, rustic
Centerpiece for the gift table


tree, trunk, candle holder, rustic, centerpiece, vase, wood
The yummy and super-creative appetizer table


Tuesday, June 19, 2012

A Nursery for Claire Bear


It is hard to believe that, in just a few short weeks, our baby girl will be here to meet us! On one hand, it feels like just yesterday that my husband and I discovered we were pregnant! On the other hand, I am going MAD waiting to see who she looks like and which features of mine and my husband's she bears. I can't wait to dress her up in the adorable outfits my relatives and friends spoiled her with, take her for walks in her stroller, and even change a gazillion diapers per day and comforting her on restless nights. Mostly, I just can't wait to have her in my arms and call her my own.

Needless to say, I have been desperately trying to keep busy in any way possible. Here is proof of my busy-ness in the form of pictures of  Claire's room! Enjoy!!!

My amazingly artistic sis-in-law, @Tiffany Beaver painted the tree and I added fabric leaves and birds to match the crib bedding. We're hoping  baby Claire comes out with lots of hair so that she can put the owl barette holder to the right of the tree to good use!

I painted the wooden letters to match Claire's bedding and hot-glued them to ribbon. Each end of the ribbon was then tied around a nail in the wall and covered with fabric-covered, wooden birds.
This plaque was featured in a blog post about a month ago, and we have finally found a home for it in Claire's room


Can't wait to put this glider to very good use. Notice the beautiful afghan on the glider, made by my fabulous mommy, @Jane Beaver!

Bird puzzle completed by shower guests assembled and displayed in baby's room. Love it!!!

For those of you who don't know me, I am obsessed with the use of Scrabble tiles in craft projects! I am passing on this obsession to my child!


Since Claire's cousins all live hours away, I decided to incorporate them into her room for her to think of them fondly when she can't see  them. Each one used their hand or footprints to create an adorable little character to add to her nursery decor! Also of note is the adorable picture frame to the left of the windowsill made by my aunt, @Julie Heckman and featuring the 3-D ultrasound pic of Claire!


A closeup of Alison's and Camdyn's nursery contributions-a birdie and an owl

Royce's, Derek's, and Adrienne's creative contributious-a butterfly, a frog, and a bouquet of flowers


Sunday, August 28, 2011

Split Canvas Tree Painting

I know…I’ve been a total blog slacker this week, but with good reason! I recently changed teaching positions from working as a consultant in early intervention, where I traveled to various preschools, daycares, and homes to work with children with a huge array of delays and diagnoses, to a self-contained classroom of students aged 9-13 with varying severities of Autism. Needless to say, my life has been more than a little consumed by this teensy little change!

Split canvas tree painting

I absolutely LOVED creating this next project, not only because it was easy and looks awesome in my organic/nature-themed room, but also because it cost me a grand total of around $2!!! I don’t think they have sold them in a while, but the Dollar Tree used to sell small canvases in packs of three and, at the time, I stockpiled them to have for future projects just like this one. I taped the backs of four of these small canvases together so that they looked like one large canvas. Using a tree I had cut out of cardstock (you could use a stencil of virtually anything and wouldn’t necessarily have to cut it out yourself), I taped it onto the canvases and used a light green acrylic paint and foam brush to cover the canvases completely with paint. After the paint dried, I carefully peeled off the cardstock to reveal the tree then sprayed a sealant over the entire painting. Once the sealant was completely dry, I removed the tape from the backs of the canvases and placed each canvas about 1” apart on the wall.
The options for this project are truly limitless! Any sized canvases could be used and you could use as many or as few as you please. An alternative to painting on canvases would be to use Modge Podge and an exacto knife to blow up your favorite picture or print, lay it across multiple canvases using Modge Podge, let it dry, and cut each canvas apart using an Exacto knife to display on your walls. Here are a few other pictures of ways in which others (far more artistically talented than me) have used the "split canvas" technique.

A LOT of printing studios offer this type of canvas now...How cool is this?

I may have to make something like this for my British grandparents!

Very pretty enlarged and cut photo

Thursday, July 28, 2011

Blossoming Tree Centerpiece


I am all about designing on a dime, so I decided to borrow from the bounty of free items Mother Nature has to offer. Using a square vase that I have had forever, I filled it with a variety of “river rocks” (that I couldn’t find in nature, so I bought from a dollar store) and placed three of my favorite branches found outside into the vase. To make the flowers, I used five sheets of tissue paper that I folded like a fan and cut into 4” pieces (for smaller flowers). I used jewelry wire to wrap around the center of each tissue paper fan, leaving a tail of wire to be used later. Carefully pull each layer of tissue paper toward the wire in the center on one side and do the same to the opposite side. Once your flower is completed to your satisfaction, use the wire to twist around any part of the branch you would prefer. Repeat this process until your “tree” is decorated the way you want.
In case you’re as much of a visual learner as I am, here is a link showing how to make a variation of tissue paper flowers somewhat like mine. http://www.wikihow.com/Make-Tissue-Paper-Flowers