Showing posts with label wooden. Show all posts

Sunday, December 8, 2013

Jenga Block Christmas Tree


Jenga!!! I used to love playing that game (although I never faired well playing it, as I was the girl who always knocked down the tower AND, as a result, had to be the one to set it back up)! On a recent trip to my local thrift store, I came across a bag of Jenga blocks for $.50 and had to have them. For what? I wasn't sure, but knew I would one day put them to good use! That day is now, my friends! After some time spent arranging and re-arranging, I transformed the blocks into a Christmas tree that I then painted and made into a wall hanging. Love it!!! Here's how you can make one of your own...

Materials:

-Jenga blocks (I used 53 of them!)
-glue gun/sticks
-sandpaper
-acrylic paint (I used a dark green, brown, light green, white, and burgundy, but the options are truly limitless!)
-sponge paintbrush
-circular, sponge brush
-sealant
-ribbon

Directions:

1. Using a glue gun, adhere Jenga blocks using the model below (each horizontal row gains two more blocks than the one above it).
2. Once the glue has dried, sand the surface of the tree to make the paint adhere more successfully
3. Paint the surface of the tree with two coats of dark green, acrylic paint and the "trunk" in brown
4. Once the paint has dried, use the circular, sponge brush to create dots all over the tree with white, acrylic paint.

5. Repeat the process of making dots using the light green, acrylic paint
6. And again with the burgundy paint
7. Finally, add dots of the original green color to the tree to cover up any spots that may have smudged.

8. Spray the tree with a sealant and let dry.
9. Fold a 5 inch piece of ribbon in half and adhere loose ends to the top of the tree, leaving a loop to hang up

Voila!!! Its yours to display proudly!

Wednesday, July 17, 2013

Chevron Painted Children's Stool


One of the (many...just ask my husband) gifts we gave Claire for her birthday was a wooden stool. While she probably can't use it the way it is meant to be used just yet, I could not pull myself away from buying it when I saw it at the craft store (story of my life)! Do you ever start thinking  about the endless amount of possibilities there are to decorate something and then get so overwhelmed that you have to put the project away and give it a few days (or weeks, or months...) before actually picking it up again and making it happen? Yeah, me neither ;) After thoughtful contemplation for longer than I care to admit, I decided on the pattern and color-scheme I wanted and got to work.

 Here's what... 

 Materials needed: 

 -acrylic paint (I used a light purple and a light blue for my color scheme) 
-foam paint brush or roller
-painter's tape 
-vinyl, adhesive letters -sealant spray 

 Instructions: 

 1. Paint the stool with two coats of acrylic paint in the color chosen as the base.


 2. After paint is completely dry, place painter's tape across the seat of the stool in a chevron pattern. 
     My pattern is, in no way, even, but I think its got character!


 3. Paint two coats of second color over the seat of the stool.


 4. Once the paint is completely dry, carefully peel off the painter's tape. Touch up any spots that may 
     have bled.


 5. Adhere vinyl letters to the seat of the stool. 


 6. Spray two coats of sealant on the stool. 

While it is not perfect, and I can see the lines I should've made straighter and marks of paint I could've made cleaner, I look forward to watching her use it to brush her teeth on her own or to sit on to watch Mickey Mouse Clubhouse in the morning and to hopefully keep for years and years to come because mommy made it for her! In my book, there is no greater reason to craft than that!


Wednesday, April 24, 2013

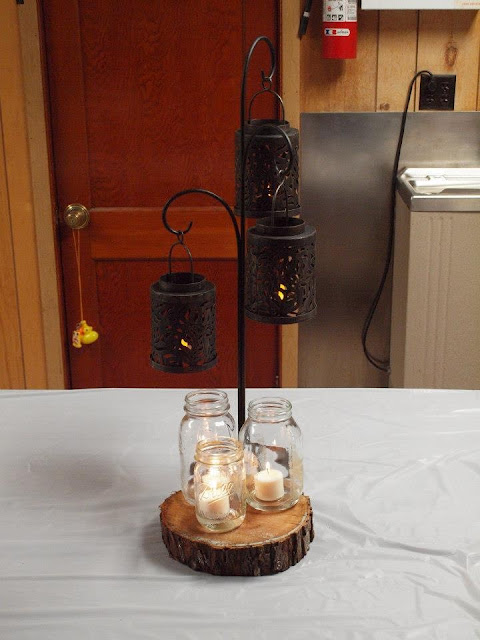
Rustic Tree Trunk Candle Holder


tree, trunk, candle holder, rustic, centerpiece, vase, wood
The gorgeous tablescape
 

When I attended my cousin Sarah's 30th birthday party in February, I had no doubt I could count on three things: good music, good food, and good people. Little did I know that my aunt and uncle would also throw in some awesomely crafty centerpieces and decor, as well! They went above and beyond to set up the tables at the party. For the center of the centerpiece, My uncle, Kevin cut each of the logs and branches out himself and hollowed out each of their tops large enough to fit a tealight. Using logs of three different lengths, my aunt, Rita adhered them together with a very strong epoxy and tied brown and green twine around them. Thankfully, she allowed me to take one home with me, as I fear I would've snatched one up with or without permission! As if that wasn't enough, Kevin also cut holes into smaller pieces of log to turn them into faux flower vases (I also currently own one of these in my household...thanks, Uncle Kev!). Rita also used white, cupcake liners (and lots of 'em) to create the adorable bouquets that sat atop glass bowls and battery-operated tealights. The party was a wonderful time, and the birthday girl made 30 look good; however, now the pressure is on for all future parties to come. Can't wait to see what kind of creation they hold...


tree, trunk, candle holder, rustic, centerpiece, vase, wood
Another view of the decor


tree, trunk, candle, candle holder, centerpiece, rustic
Centerpiece for the gift table


tree, trunk, candle holder, rustic, centerpiece, vase, wood
The yummy and super-creative appetizer table


Saturday, May 5, 2012

Dream Fairies Wooden Plaque


On my most recent trip to Hobby Lobby (an AWESOME craft store that just arrived in Pittsburgh...Woot!), I found the most adorable item. In the wooden items section of the store, I came across a wooden plaque decorated to look like the entrance to a fairy castle and meant to hang in a room (and, in my case, my own future baby girl's nursery) for fairies to enter the room. Does it get cuter than that?

Plaque as sold at Hobby Lobby

Using colors similar to those that will be used in the baby's room, I used acrylic paints to decorate the plaque. I then used scrapbooking letter stickers to create the words "Dream Fairies Enter Here" surrounding the plaque. Finally, I sprayed the entire plaque with acrylic sealant and Wah-lah!!! More pictures to come when the nursery is completed, so STAY TUNED...


Fairy entrance for baby's room


Tuesday, December 13, 2011

Scrabble Tile Coasters-third and final Scrabble gift, I promise!

Scrabble tile coasters for my mother-in-law, Francie, and my father-in-law, Bob

Here is another SUPER simple Christmas gift idea using (you guessed it!) Scrabble tiles! Using blank coasters (I found  a pack of 6 blank coasters at my local craft store for just under $2, score!), I arranged 4 rows of 5 Scrabble tiles, spelling out the names of the recipients in the second row (for my mother-in-law, Francie, I obviously also used a portion of the third row, as well!). After determining the order of letters, I removed them and painted a thick coat of Mod Podge across the front of the coaster. I then put the letters back onto the coaster in their appropriate order, making sure to center them as much as possible. After allowing the Mod Podge to dry for about 20 minutes, I spread two more layers of Mod Podge over the top of the Scrabble tiles and allowed them to dry. Using an acryllic sealant, I sprayed the coaster, allowed it to dry, and Voila!!! An unbelivably quick and easy craft project that works as a functional and personalized gift for any recipient!

Monday, December 5, 2011

How To: Scrabble Tile Pendant-Autism Awareness

Autism Awareness Scrabble tile necklace

So, I tend to develop a new, craft-related obsession every few weeks, whether it be a new craft material I’ve discovered or an awesome project I’ve found online (this is the part where I plug www.pinterest.com once again!). This week, my obsession is SCRABBLE TILES!!! Who knew you could do so much with game pieces and some craft materials (which I happen to have a few of)! My first Scrabble tile-related craft is a pendant.
As a teacher of children with Autism, I not only have the privilege of working with some amazing kids, but also with incredibly dedicated, caring, and gifted adults. In my classroom, I have three other women who work with me on a daily basis which (just ask my husband) isn’t always easy. Despite the challenges that our students present, these women handle every situation with positivity, humor, and grace. When it came to figuring out appropriate Christmas gifts to give them, I knew it had to be something appropriate to what we do on a daily basis and made with love.
The fantastic thing about Scrabble tile pendants is that you can virtually use any picture of your choosing as the centerpiece of the jewelry. Since the symbol for Autism Awareness is a multi-colored puzzle piece, my choice of picture was simple.
Here are the instructions to make your own:
Materials
*Square bail plate (sized a little smaller than a Scrabble pendant)
*Scrabble tile
*Picture printed and cut out to fit Scrabble tile
*Modge Podge
*foam paint brush
*necklace chain

Directions
1. Using a very sturdy, craft epoxy (Tacky glue or a hot glue gun simply won’t cut it, folks!), glue the bail plate (I bought mine in a pack of four at Hobby Lobby) to the lettered side of the Scrabble tile. Let dry overnight.


2. Print out an image of your choice to fit the blank side of the Scrabble tile. Note: An average Scrabble tile is 2 cm. x 1 ½ cm, or .75 inch  x .83 inch and cut out.


3. Using your foam brush, brush a layer of Modge Podge onto the blank side of the Scrabble tile.


4. Adhere your picture to the Scrabble tile. Give it a few minutes to dry a bit so that it does not slide all over the pendant for the next part.
5. Paint a heavier but consistent level of Modge Podge over the top of your picture. Let dry and paint on another layer.
6. After the pendant dries, spray an acrylic sealer over the picture-side of the pendant
7. Once the pendant is completely dry, string the necklace chain through the loop at the top of the pendant.

Voila! Easy breezy!!! PS-If you know any of my classroom assistants, mum’s the word until Christmas!

Friday, July 29, 2011

Wooden Name Nursery Decor

As soon as my brother and sister-in-law decided on a name for their baby-to-be, we took a little trip to Pat Catan’s, our local craft store here in Pittsburgh (which, I might add, is the BEST!) and immediately bought 4” letters to spell “CAMDYN.” Knowing that the baby’s room would be pink and green, we alternated pastel pink and green paint on each of the letters and created polka dots in the opposing colors then glued ribbon to the backs of each letter to hang on Camdyn’s wall.

Note: There are some AWESOME circular sponge brushes at most craft stores that are FABULOUS for polka dots and such (especially for people like me who can't draw a symmetrical shape of ANY sort on my own)!

What kind of aunt would I be without posting a pic of my fave lil' cutie pie?!?!?!


Thursday, July 14, 2011

Laundry Room Sign


Before moving into our new house, I used my spring break to binge on craft projects. Using the Cricut machine (which I ADORE) I got for Christmas, I cut letters to spell the word “LAUNDRY” and placed them the way I wanted them on a blank sign I purchased at a dollar store years ago and painted white using two coats of acrylic paint. In retrospect, I would NOT have glued the letters onto the sign using scrapbooking tape as I did, because it was a HUGE pain to take the letters off after painting over them. I would suggest using simple Scotch tape rolled up and placed on the backs of each of the letters as “flatly” as possible. Paint over the letters (carefully) and sign completely using 2 coats of another color acrylic paint (I used a mint green) and let dry. Once dry, carefully peel off the letters to reveal the color underneath of the top coats. Using a glue gun, place three clothespins (I painted mine white, but you wouldn’t necessarily need to do the same) along the bottom of the sign to use for un-matched socks or to hold dryer sheets. Spray a clear acrylic lacquer over the entire sign and clothespins and let dry. Using a 24” ribbon, thread each side of the ribbon into the holes in the sign and tie bows on each side for hanging.