Showing posts with label green. Show all posts

Sunday, March 16, 2014

St. Patty's Day Mason Jar Glass


What is it about Mason jars that makes me feel as though I cannot ever have too many??? Gah, I absolutely love them and all of the possibilities they provide! Vases, lamps, light fixtures, home decor, salad storers, coffee makers (ok, that last one may have been a bit of an embellishment, but its only a matter of time before someone figures it out...) you name it, it can be made using a mason jar! I'm completely obsessed! In fact, I performed a literal happy dance in the middle of Hobby Lobby when I saw that they sold Daisy lid inserts. I have been eyeing them up online for months but was never willing to pay the ridiculous shipping prices, so you can imagine my craft nerd excitement... Anywho, here's how I transformed a Mason jar into a Gold Shamrock Drink Holder, perfect for upcoming St. Patty's Day festivities:

Materials:

-Mason jar
-Martha Stewart glass paint in gold metallic
-foam paintbrush
-contact paper
-scissors
-Mason jar daisy lid insert
-paper straw
Instructions:

1. Cut out a shamrock shape out of contact paper (I made a cardstock template first using the old four heart shapes connected and a stem trick from 3rd grade art class)

2. Remove adhesive backing from contact paper and place on Mason jar
3. Using a foam brush, paint the Mason jar entirely with glass paint (I ended up painting 3 coats total)
4. After paint dries completely, carefully peel off shamrock shape
5. Pour your favorite drink (preferably a green one), daisy insert and cute paper straw into Mason jar and enjoy!!!

Claire was a huge fan of our green lemonade, but these glasses could certainly feature any adult beverage to celebrate the occasion, as well!

HAPPY ST. PATRICK'S DAY!!!!!

Wednesday, March 5, 2014

Button Shamrock Pin

Ok, seriously, how is it March already??? I literally closed my eyes and February was over; not that I'm complaining, because Mother Nature has not been kind to us here in Western PA, but wow! With that being said, let's get some St. Patty's Day craft-ness going! First up is this ridiculously simple and insanely cute shamrock pin made of buttons...

Materials:

-four, green buttons, approximately the  same size
-glue gun/glue sticks
-green ribbon, cut to about 4"
-flat-backed pins (typically sold in the jewelry-making sections of craft stores)

Instructions:

1. Glue together two buttons diagonally together as shown in the picture below
2. Glue on a third button (picture below)
3. Glue fourth button to the bottom of the shamrock
4. Glue flat part of the pin to the back of the buttons near the center
5. Fold ribbon in half and glue open ends together
6. Glue ribbon to bottom of buttons so that loop of the ribbon is shown as the stem of the shamrock. 
Warning...There WILL be glue gun strings! Use a hair dryer to get rid of any loose strings! Make a bunch of these and pass them out to co-workers, secretaries, neighbors, etc. So simple, but they'll love them! And, as always, send me pics of what you make!

Friday, July 5, 2013

Claire's 1st Birthday Panda Party


It is still so hard to believe my little munchkin is a year old! When people tell you how quickly the time goes by with a little one, you assume its cliche...until it happens to you! As you may or may not know, I love me some theme parties, and since this is probably the only time in her life Claire cannot tell me exactly what kind of party she wants, my hubby and I decided on a panda theme, because of our love of all things panda bears (don't ask...). You might be surprised to know there are very few panda party supplies out there...enter craft nerd! Claire's outfit consisted of a pink onesie and two appliques found at my fave, Hobby Lobby. Her skirt was made from pink ribbon and bright pink, lime green, black, and white tulle. You can find instructions for making a tutu using these materials HERE!
http://bebehblog.com/the-most-unnecessary-craft-tutorial-ever-baby-tutu/

Colors chosen to go along with this theme were black and white polka dot, pink, and lime green. I found pink and green tablecloths at Five Below and taped down black and white polka dot streamers to the middle of each table (streamers, along with pink, green, and polka dot balloons were purchased at HL). Each guest received a fortune cookie to go along with the panda/China-theme (and who doesn't love fortune cookies!).

I used plastic, iced tea jugs as a base for these panda centerpieces. Faces were cut out of sticky-backed felt and google eyes were adhered to black spots using a low-temp, glue gun. Black, duct tape was wrapped around each jug for the panda's chest, while rectangular pieces of tape were cut and folded so that there was a short tail of duct tape remaining to stick onto the jugs for ears. Ears were rounded off using scissors. Arms were cut out of black felt and adhered to the jug using small pieces of black, duct tape. Balloons were then easily tied to the handles of the jugs.


Panda decor proved to be pretty easy to find, considering all of the stuff we have sitting around our house. The smash cake was created using a bear cake pan purchased at Michael's, cake mix ('aint nobody got time fo' cake made from scratch!), white icing, and black sprinkles that my awesomely, creative sister-in-law helped me place in all the appropriate places to make it look like a panda. Panda cupcakes were based loosely on a Pinterest picture I had seen. Ears and black behind the eyes were made with baking chocolate discs and noses made with regular, chocolate chips. We placed a little icing on the backs of candy eyes and placed them on top of the baking discs to complete our masterpieces!


Lovely panda cutout models

Panda cutouts were made using foam core boards (purchased at my local dollar store) and black paint, and scissors and kiddos' favor bags were created using white, paper bags, black cardstock, and a low-temp, glue gun. Since the contents of the girls' favor bags were a little different than the boys', I also glued some pink bows to the girlie bags!


The banners read "Happy 1st Birthday Claire" and were made using fabric cut into triangles and sewn onto white ribbon and sticky-backed, felt letters. The pandas below the banner featured monthly pictures of Claire on their bellies.


I found green, paper, lanterns at my local craft store and transformed white, paper lanterns into hanging pandas using a permanent marker for the face and black cardstock for the ears. Claire's chair cover was made using a white pillowcase decorated with black felt made to look like a panda face. This was a super, easy project that I would highly recommend for any birthday theme!
 
Claire's chair cover, table centerpiece, and the birthday girl (in panda outfit #2 due to the cake massacre) checking out some gifts
Total cake demolition


Bubble and water-play stations were set up outside for antsy kiddos...an absolute must for summer, birthday parties!


Friday, March 22, 2013

Fabric Bow Ties

It feels as though this project was completed ages ago, as it was one of my "crafts to complete before baby" way back in June for my nephew Royce's first birthday, which just happened this past weekend (and allow me a minute to just brag that he is the sweetest, most adorable one year old EVER)! Pics from his "mustache bash" party to come! Anywho, here is the first of two projects for my sweet little nephy! Happy birthday, Roycey! We love you!!!!!

I found the BEST tutorial on creating simple, fabric bow ties.  Here are pics of some I made myself, along with the link containing the directions:


Sock monkey bow ties for my nephew and his daddy (if he can be convinced to wear one!) Stay tuned for the matching vest!

Use a clip-on earring clip to attach the bow tie to any shirt...Genius!


Another pair of fabulous bow ties


Wednesday, April 25, 2012

Baby Tutu for Monthly Photos


Cutest little model I ever did see!

The inspiration for this project was an adorable sticker pack called "Sticky Bellies" that I found at Hobby Lobby ($9.99 for a pack of 12/ $6 if you've got one of their 40% off coupons)! In the package, colorful stickers are labeled 1-12 months and meant to be displayed on baby's onesie or shirt for monthly pictures. A picture of an adorable baby girl wearing a Sticky Belly on a shirt and a sweet, little tutu gave me the perfect idea for the ensemble my baby girl could eventually wear. I have seen instructions for and pictures of adorable ribbon and tulle tutus that I have been meaning to make for what seems like forever now. I went to my local Wal-Mart and bought 1 yard each of brightly colored blue, pink, purple, and green tulle, along with polka-dot, pink ribbon and followed the directions I found online through the website indicated below (keeping in mind I measured the ribbon according to baby's potential waist and height adding lots of extra so that it expands as she does; the directions call for a larger child's dimensions):


A view of the entire skirt...I may add more tulle pieces to fluff it up a bit


Bonus pic of a Steelers tutu I made for my little munchkin (please pray she doesn't hate me some day for making her wear all these flippin tutus!)

Thursday, October 13, 2011

Sweet Treats Baby Shower Theme

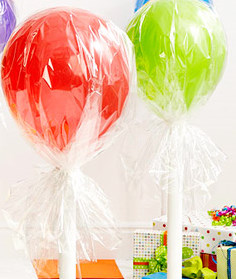
A fantastic example of balloon lollipops, courtesy of  holymamablog

An example of balloon candy courtesy of ohdeedoh.com

Here are some instructions for “candy” or “sweet treat” themed parties. My sister-in-law’s baby shower was themed “Sugar and Spice” in honor of her upcoming baby girl, so this idea worked out perfectly.
Balloon Lollipop Instructions
Materials:           
-balloon
-Saran Wrap or shrink wrap
-curling ribbon
-paper towel tube
-scissors
-tape
 Instructions:
1. Blow up medium-sized balloon.
2. Tape the bottom of the balloon to the opening of the paper towel tube to secure
3. Place a sheet of Saran Wrap over the entire balloon, leaving additional wrap at the bottom of the balloon
4. Using curling ribbon, tie it around the bottom of the balloon, securing the Saran wrap. Curl the access ribbon using your scissors. Curling ribbon can also be used to wrap around the paper towel tube to make it more decorative.
Our decor for my sister-in-law's shower ("candies" are on tables and "lollipops" are on the wall)


Balloon Penny Candy Instructions
Materials:
-balloon
-Saran wrap
-curling ribbon
-scissors
Instructions:
1. Blow up balloon
2. Placing the balloon in the center of a long piece of Saran wrap, roll the wrap around the balloon, covering the balloon entirely with Saran wrap and leaving excess on each side of the balloon.
3. Twist the access Saran wrap on each side of the balloon and tie curling ribbon around the sides. Curl access ribbon using scissors


sheekshindigs.blogspot.com gives an adorable play on balloon lollipops


Sunday, August 28, 2011

Split Canvas Tree Painting

I know…I’ve been a total blog slacker this week, but with good reason! I recently changed teaching positions from working as a consultant in early intervention, where I traveled to various preschools, daycares, and homes to work with children with a huge array of delays and diagnoses, to a self-contained classroom of students aged 9-13 with varying severities of Autism. Needless to say, my life has been more than a little consumed by this teensy little change!

Split canvas tree painting

I absolutely LOVED creating this next project, not only because it was easy and looks awesome in my organic/nature-themed room, but also because it cost me a grand total of around $2!!! I don’t think they have sold them in a while, but the Dollar Tree used to sell small canvases in packs of three and, at the time, I stockpiled them to have for future projects just like this one. I taped the backs of four of these small canvases together so that they looked like one large canvas. Using a tree I had cut out of cardstock (you could use a stencil of virtually anything and wouldn’t necessarily have to cut it out yourself), I taped it onto the canvases and used a light green acrylic paint and foam brush to cover the canvases completely with paint. After the paint dried, I carefully peeled off the cardstock to reveal the tree then sprayed a sealant over the entire painting. Once the sealant was completely dry, I removed the tape from the backs of the canvases and placed each canvas about 1” apart on the wall.
The options for this project are truly limitless! Any sized canvases could be used and you could use as many or as few as you please. An alternative to painting on canvases would be to use Modge Podge and an exacto knife to blow up your favorite picture or print, lay it across multiple canvases using Modge Podge, let it dry, and cut each canvas apart using an Exacto knife to display on your walls. Here are a few other pictures of ways in which others (far more artistically talented than me) have used the "split canvas" technique.

A LOT of printing studios offer this type of canvas now...How cool is this?

I may have to make something like this for my British grandparents!

Very pretty enlarged and cut photo

Thursday, August 11, 2011

Initial Vase


Bridesmaid gift from my sister


This next set of props goes out to my little sister, Kyra (who, if I haven’t mentioned it a million times already, is expecting her first baby, a little boy, in September). For her wedding, she made each of her six bridesmaids vases in her wedding colors (purple and green) using glass blocks (which you can do a GILLION things with, by the way). She sponge-painted the outsides of each vase with a light purple, acrylic paint. After the paint dried, she then stenciled our respective first initials onto the vases in a darker purple, tied a green ribbon in a small bow on the bottom of the vase, and placed a lime green, gerber daisy into it. It is currently sitting on my night stand, and I intend to keep it around for a very long time to come. Thanks again, sissybabes!!!

The options for these things are limitless and they come in all shapes and sizes
 
Another view of the super cute vase

My sister, Kyra---looking adorable and ready to POP!!!