Showing posts with label pink. Show all posts

Saturday, October 26, 2013

Breast Cancer Awareness Jewelry

October is filled with so many exciting things...leaves changing colors, Halloween, candy, parties, pumpkin-flavored everything, the list goes on and on. In fact, October becomes so chaotic at times that we have to remind ourselves that it is also breast cancer awareness month. Unfortunately, my aunt Debbie needed no reminders that October brings added awareness to the evil that is breast cancer, as she received her diagnosis of an agressive form of Stage 1 breast cancer early on in the month. If I know my sweet aunt, I have no doubt she will fight this battle with determination, class, and quiet strength, just like she handles every obstacle that has ever come her way.

My school recently held a Spaghetti dinner, in which each classroom was asked to donate a raffle basket. For my classroom, our basket theme was a no-brainer. In our "Be Aware" basket, we included a pink journal, shoelaces, scarf, t-shirts, cup, keychain, and tote bag, along with the bracelet and earrings set and necklace shown in the pictures. This one's for you, Deb! We love you and have absolute faith that you will fight and win this battle.

For more information on breast cancer, please visit THIS SITE!


Friday, July 5, 2013

Claire's 1st Birthday Panda Party


It is still so hard to believe my little munchkin is a year old! When people tell you how quickly the time goes by with a little one, you assume its cliche...until it happens to you! As you may or may not know, I love me some theme parties, and since this is probably the only time in her life Claire cannot tell me exactly what kind of party she wants, my hubby and I decided on a panda theme, because of our love of all things panda bears (don't ask...). You might be surprised to know there are very few panda party supplies out there...enter craft nerd! Claire's outfit consisted of a pink onesie and two appliques found at my fave, Hobby Lobby. Her skirt was made from pink ribbon and bright pink, lime green, black, and white tulle. You can find instructions for making a tutu using these materials HERE!
http://bebehblog.com/the-most-unnecessary-craft-tutorial-ever-baby-tutu/

Colors chosen to go along with this theme were black and white polka dot, pink, and lime green. I found pink and green tablecloths at Five Below and taped down black and white polka dot streamers to the middle of each table (streamers, along with pink, green, and polka dot balloons were purchased at HL). Each guest received a fortune cookie to go along with the panda/China-theme (and who doesn't love fortune cookies!).

I used plastic, iced tea jugs as a base for these panda centerpieces. Faces were cut out of sticky-backed felt and google eyes were adhered to black spots using a low-temp, glue gun. Black, duct tape was wrapped around each jug for the panda's chest, while rectangular pieces of tape were cut and folded so that there was a short tail of duct tape remaining to stick onto the jugs for ears. Ears were rounded off using scissors. Arms were cut out of black felt and adhered to the jug using small pieces of black, duct tape. Balloons were then easily tied to the handles of the jugs.


Panda decor proved to be pretty easy to find, considering all of the stuff we have sitting around our house. The smash cake was created using a bear cake pan purchased at Michael's, cake mix ('aint nobody got time fo' cake made from scratch!), white icing, and black sprinkles that my awesomely, creative sister-in-law helped me place in all the appropriate places to make it look like a panda. Panda cupcakes were based loosely on a Pinterest picture I had seen. Ears and black behind the eyes were made with baking chocolate discs and noses made with regular, chocolate chips. We placed a little icing on the backs of candy eyes and placed them on top of the baking discs to complete our masterpieces!


Lovely panda cutout models

Panda cutouts were made using foam core boards (purchased at my local dollar store) and black paint, and scissors and kiddos' favor bags were created using white, paper bags, black cardstock, and a low-temp, glue gun. Since the contents of the girls' favor bags were a little different than the boys', I also glued some pink bows to the girlie bags!


The banners read "Happy 1st Birthday Claire" and were made using fabric cut into triangles and sewn onto white ribbon and sticky-backed, felt letters. The pandas below the banner featured monthly pictures of Claire on their bellies.


I found green, paper, lanterns at my local craft store and transformed white, paper lanterns into hanging pandas using a permanent marker for the face and black cardstock for the ears. Claire's chair cover was made using a white pillowcase decorated with black felt made to look like a panda face. This was a super, easy project that I would highly recommend for any birthday theme!
 
Claire's chair cover, table centerpiece, and the birthday girl (in panda outfit #2 due to the cake massacre) checking out some gifts
Total cake demolition


Bubble and water-play stations were set up outside for antsy kiddos...an absolute must for summer, birthday parties!


Friday, September 7, 2012

Interchangeable Accessories for Baby


My sweet little accessories model

While I don't claim to be a fashionista by any stretch of the imagination, with the birth of my little sweetheart, Claire, I am now starting to live vicariously through her wardrobe! The options for baby girl clothing are truly limitless...Unfortunately, the money in my wallet is not! This project allows me to fashionably and affordably dress my little sweet pea to my heart's content!


Dollar Store Items purchased


Flowers created using ribbon

Rolled flowers created using the ribbon lining of the tutu

Bows created courtesy of green and white scarf and ribbon

Organza flowers made using tutu fabric

Fabric flowers made using scarf material
 
Materials:

-baby onesie
-green and white, striped scarf
-purple ribbon
-baby tutu
-headbands (sold in set of four)
(items above were all purchased at my local Dollar Tree)
-scissors
-glue gun
-Velcro (iron-on or sewable)
-needle and thread

Instructions:

1. Wash and iron onesie

2. Adhere a small piece of soft Velcro to the area on the onesie you wish to be embellished. Do the same to the corresponding headbands.


3. Adhere a small piece of rough Velcro to the back of each bow and flower embellishment. Note: The embellishments I created came from a variety of online tutorials, projects I have created before, and simply playing around with the materials I purchased. The sky is the limit, as far as the type of embellishments you choose to make!


4. Here comes the fun part...Mix and match embellishments to create multiple, adorable outfits and accessories! Add a cute tutu or skirt to complete the look (check out the "tututorial" for a simple baby tutu like Claire's in a former blog post)!


One of many possible onesie/headband combinations


Claire modeling outfit number 2! She was waaaay too wiggly for a really good shot of the accessories, but you get the idea!


Another shot of my wiggly wonder!
  

Wednesday, April 25, 2012

Baby Tutu for Monthly Photos


Cutest little model I ever did see!

The inspiration for this project was an adorable sticker pack called "Sticky Bellies" that I found at Hobby Lobby ($9.99 for a pack of 12/ $6 if you've got one of their 40% off coupons)! In the package, colorful stickers are labeled 1-12 months and meant to be displayed on baby's onesie or shirt for monthly pictures. A picture of an adorable baby girl wearing a Sticky Belly on a shirt and a sweet, little tutu gave me the perfect idea for the ensemble my baby girl could eventually wear. I have seen instructions for and pictures of adorable ribbon and tulle tutus that I have been meaning to make for what seems like forever now. I went to my local Wal-Mart and bought 1 yard each of brightly colored blue, pink, purple, and green tulle, along with polka-dot, pink ribbon and followed the directions I found online through the website indicated below (keeping in mind I measured the ribbon according to baby's potential waist and height adding lots of extra so that it expands as she does; the directions call for a larger child's dimensions):


A view of the entire skirt...I may add more tulle pieces to fluff it up a bit


Bonus pic of a Steelers tutu I made for my little munchkin (please pray she doesn't hate me some day for making her wear all these flippin tutus!)

Saturday, March 31, 2012

How To: Simple Baby Booties


Sweet little slippers for our upcoming arrival

Since I have FINALLY had some energy and free time this weekend (this whole developing a life inside of you thing is NO JOKE!), I decided I would do some crafting. Some crafting turned into a marathon day of gluing, painting, jewelry-making, photographing, brainstorming, organizing, sewing, you name it! All in all, my idea of a fabulous day!

My first project was finishing up the baby slippers I had started weeks and weeks ago. I have wanted so badly to make baby slippers similar to the ones my cousin, Kristin made for my nephew around Christmas time. After I found the pattern and instructions online (which I will happily share with all of you!), I got started with pinning and sewing and making a few of my own adaptations. Here is a great webpage that will take you through the process step-by-step and also includes a pattern for the slippers themselves.

Since I am not the most gifted hand-stitcher, I decided to match the thread I used to sew the slippers to the color of the fabric as best I could and create smaller stitches than those shown  in the instructions (in other words, the less people able to see my stitching, the better off we all are!). In addition, since I am having a girl and she will be the recipient of these slippers, I decided to sew ribbon along the upper edges of each pair of slippers to create a cute bow that could be tied in the front.


Black and gold slippers for baby girl to rock out during Steelers football season


Sweet little pink booties with white ribbon


Probably my favorite pair-gray felt slippers with purple ribbon.


Friday, February 10, 2012

Organza Flower Hair Clips


Organza flowers

Now that my favorite local craft store, Pat Catan’s, has begun selling organza fabric, I have been obsessed with making organza flowers, which look much more complicated than they actually are! There are a million different ways to create these types of flowers, but I simply cut out organza circles in 4-5 different sizes and singed around the edges using a lighter (be careful to not leave on too long, as the fabric will burn!). The circles naturally curl up when singed, creating a flower petal look. Using a needle and thread, I sewed each of the circles together with the large circle on the bottom descending to the smallest circle on the top. I then embellished the flowers by hot-gluing various beads into the center of the flower. Easy peasy lemon squeezy! Flowers can be adhered to hair clips, headbands, pins, household decorations, etc. The sky is the limit!
Organza fabric used for this project


Thursday, October 13, 2011

Sweet Treats Baby Shower Theme

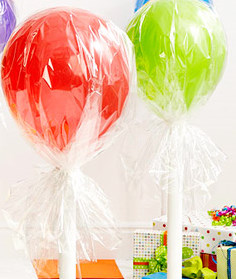
A fantastic example of balloon lollipops, courtesy of  holymamablog

An example of balloon candy courtesy of ohdeedoh.com

Here are some instructions for “candy” or “sweet treat” themed parties. My sister-in-law’s baby shower was themed “Sugar and Spice” in honor of her upcoming baby girl, so this idea worked out perfectly.
Balloon Lollipop Instructions
Materials:           
-balloon
-Saran Wrap or shrink wrap
-curling ribbon
-paper towel tube
-scissors
-tape
 Instructions:
1. Blow up medium-sized balloon.
2. Tape the bottom of the balloon to the opening of the paper towel tube to secure
3. Place a sheet of Saran Wrap over the entire balloon, leaving additional wrap at the bottom of the balloon
4. Using curling ribbon, tie it around the bottom of the balloon, securing the Saran wrap. Curl the access ribbon using your scissors. Curling ribbon can also be used to wrap around the paper towel tube to make it more decorative.
Our decor for my sister-in-law's shower ("candies" are on tables and "lollipops" are on the wall)


Balloon Penny Candy Instructions
Materials:
-balloon
-Saran wrap
-curling ribbon
-scissors
Instructions:
1. Blow up balloon
2. Placing the balloon in the center of a long piece of Saran wrap, roll the wrap around the balloon, covering the balloon entirely with Saran wrap and leaving excess on each side of the balloon.
3. Twist the access Saran wrap on each side of the balloon and tie curling ribbon around the sides. Curl access ribbon using scissors


sheekshindigs.blogspot.com gives an adorable play on balloon lollipops